Posted by Tara on Saturday, February 13th, 2010

Here’s a photo of one of the happiest days of my life. I married my soulmate, my best friend, my high school sweet heart. He always was, still is, and always will be the love of my life. He is also my web-manager, food designer, and photographer for Taracooks.com. He has taken my dream of having a cooking web-site and made it a reality. Richard, thanks so much for all you do for me! It is a joy to cook for you. Happy Valentines Day Everyone!
 Share on Facebook
Filed in Uncategorized | 4 responses so far
Posted by Tara on Thursday, February 11th, 2010
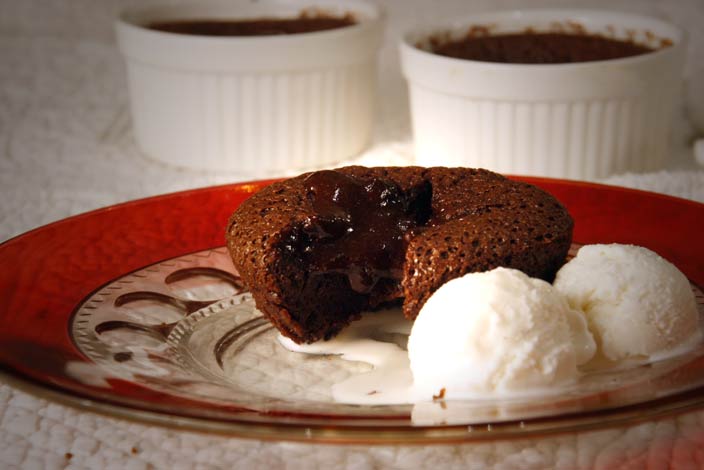
Warning! This dessert is addictive and may be hazardous to your waist and hips. There – I said it. Consider yourself warned. Make this dessert for Valentine’s Day and your family will love you even more. If they fail to love you after making this, then take a cruise without them!
- 12 oz package semi-sweet chocolate
- 2 1/3rd sticks of real butter
- 7 eggs
- ½ cup sugar
- ½ cup plain flour
Melt chocolate and butter. I microwaved them for 2 minutes but you could also melt these ingredients in a double boiler. While chocolate and butter is melting, add sugar and 4 of the eggs. Wisk by hand a couple of minutes, then add flour and remaining eggs. Wisk to blend. Then add the egg, flour, sugar mixture to the melted mixture. Pour into greased Ramekin cups.
Bake on 425 for 15-20 minutes. Garnish with sweet chocolate, chocolate sauce, or powdered sugar. Serve with ice cream on the side.
Makes 8-10 Ramekin cups.
Printable Recipe
Download Adobe Reader
 Share on Facebook
Tags: Chocolate Melting Cake, valentine's day
Filed in Pies and Cakes | Comments Off on Chocolate Melting Cake
Posted by Tara on Sunday, February 7th, 2010

Both my Grandmothers were excellent fried pie makers. I remember the process seemed to be quite involved and the end result was a special treat for family gatherings or even for birthdays. I’ve never had a store bought fried pie that came close to matching the taste of those good old fashioned, home made pastries. Neither of my Grandmothers followed a recipe. I think they were born with “fried pie instinct.” If they had documented the whole process, I’m sure this recipe could have been THE ONE. These are terrific!
Dough:
-
2 ½ cups all purpose flour
-
1 Tablespoon baking powder
-
1 Tablespoon sugar
-
1 teaspoon salt
-
1/3 cup organic vegetable shortening
-
1 egg, beaten
-
6 ½ oz can evaporated milk
Sift dry ingredients together in large bowl. Cut in shortening with pastry cutter. Mix egg with milk and add to dry mixture to make stiff dough. Chill for 24 hours (I have cheated and stuffed the dough in the freezer for an hour, or only refrigerated the dough a couple of hours, but hey, I’m an impatient rebel). Roll out to 1/8 inch thickness. Cut into 4 inch circles. Place 2 Tablespoons of fruit off center of each circle. Fold over and press edges together with a fork. Prick both sides with fork to vent.
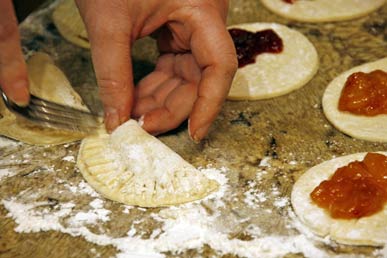
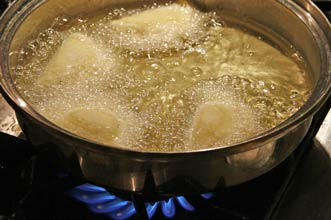
Fry in medium hot oil until golden brown. Drain on paper towels. Sprinkle powder sugar over browned fried pies.
I use my heavy duty mixer to cut the shortening into the flour, and to continue mixing the dough. It’s EASY!
Filling:
-
1 cup dried fruit such as apples, peaches apricots, figs or prunes
-
2 cups water
-
Sugar to taste
-
Spices to taste: Cinnamon, Nutmeg, Cloves
Combine dried fruit with water in saucepan. Bring to boil and reduce heat. Cover and simmer for 30 minutes or until fruit is tender and water is absorbed. Combine fruit with sugar and spices to taste. Mix well. Each dough circle needs about 2 Tablespoon of fruit mixture.
I have also used frozen peaches in place of the dried fruit. I simply defrost them in the microwave, and heat the mixture in a pan over medium heat. I stir frequently and cook until a lot of the moisture is absorbed (about 15 minutes). Then I add ½ cup sugar and any desired spices. Peach and Apple pies are my favorite.
I have also used 2 Tablespoons of Strawberry Jam, or 2 Tablespoons of Dicken’s Lemon Curd in our fried pies. The lemon ones are incredible.
Printable Recipe
Download Adobe Reader
 Share on Facebook
Tags: organic, Southern Fried Pies
Filed in Pies and Cakes | Comments Off on Southern Fried Pies
Posted by Tara on Thursday, February 4th, 2010

- 2 cans Rotel – one regular, one mild
- 1 large can whole tomatoes
- ¼ cup chopped sweet yellow onion
- 2-3 cloves garlic – chopped
- ¾ cup chopped cilantro
- ¼ teaspoon sugar
- ¼ teaspoon salt
- ¼ teaspoon cumin
- Juice of one lime
Place all ingredients in food processor and pulse 6-8 times or until salsa becomes desired consistency. Some like it smooth. Some like it chunky. Refrigerate overnight before serving for best flavor. Serve with quesadillas, or with corn chips. Our family likes to mix ½ salsa and ½ ranch dressing for a sandwich spread, dressing, or dip.
Printable Recipe
Download Adobe Reader
 Share on Facebook
Tags: Salsa
Filed in Appetizers | One response so far
Posted by Tara on Monday, February 1st, 2010

The recipe for whoopie pies has its origins with the Amish, and in Lancaster county, Pennsylvania, it is not uncommon to find roadside farm stands offering these desserts. Amish cooking is about old recipes that have fed families for generations, with no trendy or cross-cultural fusions or mixtures. These cake-like whoopie pies were considered a special treat because they were originally made from leftover batter. According to Amish legend, when children would find these treats in their lunch bags, they would shout “Whoopie!” I used Red Velvet Cake mix to create a special Valentine treat for all the sweeties in my life.
- 1 box Red Velvet Cake Mix
- ½ cup oil
- 2 Tablespoons Water
- 2 eggs
Combine dry cake mix with oil water and eggs. Use a 2 oz cookie dough scoop to drop scoops of dough onto cookie sheet 2 inches apart. Bake 325 degrees for about 13 minutes. Cool on wire rack.
Filling:
- 1 stick soft butter
- 1 cup powdered sugar
- 2 cups marshmallow cream
- 1 teaspoon vanilla
Beat together butter and powdered sugar. Beat in the marshmallow cream and vanilla, blending until smooth. Spoon about a Tablespoon of filling onto the bottom of a cookie. Press the bottom of another cookie on top of filling to make a sandwich. Repeat with remaining cookies and filling. Store pies between layers of wax paper in airtight container and refrigerate for up to 2 days.
Printable Recipe
Download Adobe Reader
 Share on Facebook
Tags: red velvet whoopie pies
Filed in Cookies, Candies, and Squares,Desserts | 4 responses so far
Posted by Tara on Wednesday, January 20th, 2010

This is one of my original creations which evolved over the years, mainly because I never wrote it down. I’ve had several requests from the family to make this soup lately. So after making a huge pot yesterday while it snowed, and having 5 teens and 2 tweens here all day, I have finally documented the process- for all our sakes.
This soup is incredibly tasty and nutritious. The country ham pieces infuse the soup, sealing in the flavors of the garlic, onions, celery, and spices. It makes an over generous portion, which freezes well, and can be reheated later. Black Bean N Ham Soup can be served along side your favorite cornbread. The ham can be omitted for a vegetarian meal. This soup can also be served with cheddar cheese, sour cream, and corn chips for variation.
No matter how you serve it, Black Bean N Ham Soup is a COLD BUSTER, guaranteed to warm and comfort on a bitter cold winter’s day!
- Finely chop the following by hand or in a food processor:
- 2 stalks celery
- 2 large carrot sticks or 1cup of mini carrots
- 1 sweet yellow onion
- 4 garlic cloves
- 1 red or green bell pepper
Pour ¼ cup olive oil or vegetable oil into a large skillet. Add chopped veggies and sauté over medium heat 2-3 minutes. Set aside.
- 6 cans black beans, rinsed and drained and halved
- 2 cans chicken broth (about 8-10 cups)
In a blender or food processor, puree HALF of the black beans with 1 can of chicken broth. Transfer the puree to a large Dutch oven or soup pot. Add the remaining black beans and the other can of chicken broth. Then add the following canned items and stir to blend:
- 1 can petite diced tomatoes
- 1 can tomato sauce
- 1 can Rotel tomatoes (I used mild)
Then add the following spices to the pot:
- 1 Tablespoon Oregano
- 1 Tablespoon Cumin
- 2 Tablespoons Chili Powder
- 2 Bay Leaves
Next add:
- 1 cup chopped country ham pieces
Then add the sautéed vegetables to the pot. Bring soup to a low boil over medium heat stirring frequently. Then reduce soup to a simmer for 30-40 minutes – stirring frequently.
Add 1-2 cups cooked white rice to the soup the last 5 minutes of simmering time. More chicken broth or water can be added if you prefer more liquid. The salt in the country ham pieces provided adequate flavor – but salt can be added to suit your on preference. Enjoy!
Printable Recipe
Cold Busting Black Bean N Ham Soup
Download Adobe Reader
 Share on Facebook
Tags: black bean & ham soup
Filed in Soups and Salads | 8 responses so far
Posted by Tara on Tuesday, January 19th, 2010
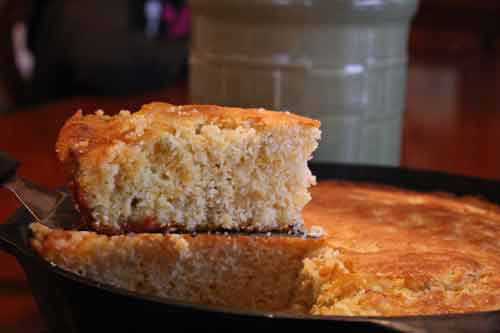
Here’s a quick alternative to traditional cornbread that offers some cheesy flavor and a little KICK. This pairs well with Taco Soup, Cold Bustin’ Black Bean N Ham Soup, or any soup with a Southwestern flair.
- 3 cups self-rising corn meal
- 3 Tablespoons sugar
- 1 Tablespoon salt
- 1 ½ cups graded sharp cheddar cheese
- ¾ cup oil
- 1 large onion, chopped
- 1 ½ cups milk
- 3 eggs, beaten
- 1 can yellow cream style corn
- 2 4 oz cans chili peppers (El Paso brand) or 2 jalapeno peppers seeded and finely chopped
Mix above well. Cover the bottom of 2 cast iron skillets with bacon drippings or oil while oven preheats to 400 degrees. Bake cornbread for 30-40 minutes. Serve Hot!
Printable Recipe
Ann’s Mexican Cornbread
Download Adobe Reader
 Share on Facebook
Filed in Breads, Doughs, and Crusts | Comments Off on Ann’s Mexican Cornbread
Posted by Tara on Sunday, January 17th, 2010
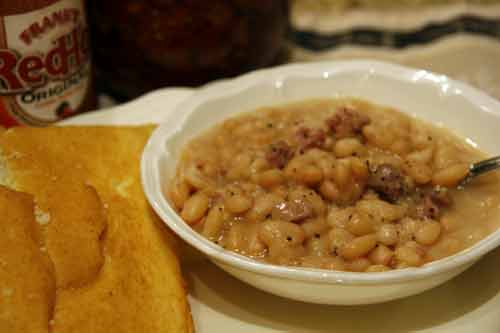
Dried beans with cornbread was a common meal at our house when I was growing up. My Dad was a whiz at bean cooking while mom baked the best cornbread I’ve ever tasted. In all my married years – I’ve never tried cooking dried beans. You see, I have a deep fear of pressure cookers – which was often used to cook dried beans at our house. Many Sunday mornings my family would attend the local church in the country with Grandmother and Granddaddy and return to her house for one of her “Sunday Dinners.”
One Sunday morning before church, Grandmother put a roast in a pressure cooker to simmer during the sermon. We had no idea we would all have a visual aid to reinforce the preacher’s “hell, fire and brimstone” sermon when we returned to Grandmother’s house following morning worship. The smell of scorched beef met us at the door as clouds of thick smoke billowed through the house. At some point during that fiery sermon, the pressure cooker exploded, hurling burnt beef in all directions – and Sunday dinner stuck to Grandmother’s ceiling over her stove.
Here’s a safer way to cook dried beans – and it doesn’t even involve the typical soaking method. This meal is a low budget people pleaser totaling about $5!
- 4 Tablespoons Butter
- 4 Tablespoons Olive Oil
- 1 sweet onion finely chopped
- 3-4 cloves garlic – minced
- 2 cups dried white or navy beans – rinsed
- 4 cups chicken stock (or more if you prefer a thin soup for the beans)
- 4 cups water
- 2 cups diced country ham
- Black or white pepper to taste
Heat butter and oil over medium heat in large pot or Dutch oven. Add chopped onions and minced garlic and sauté, stirring constantly for a couple of minutes. Then add the rinsed white or navy beans to the onions and garlic. Stir and cook over medium heat another minute. Add chicken stock and water. Bring to a rolling boil, and then reduce heat to a low simmer. Let beans simmer for one hour then add the ham pieces. Continue to let beans and ham simmer for at least another hour or until beans are tender. Additional chicken stock or water can be added to the beans if a thin soup is preferred. Season with white or black pepper to taste.
Printable Recipe
Download Adobe Reader
 Share on Facebook
Tags: White Beans N Ham
Filed in Soups and Salads | 2 responses so far
Posted by Tara on Friday, January 15th, 2010

I just love Facebook! Heather, a Facebook friend and photographer, posted the recipe for these Cherry Cheesecake Cookies and tagged me. I just love being tagged in cyberspace with great recipes. No writing required! Thanks Heather for sharing one of your recipes with me. The cookies were fantastic and the kids ate them – in spite of the FRUIT on top.
Makes about 4 ½ dozen cookies
• 3 ½ cups all-purpose flour
• 2 teaspoons baking powder
• 1 teaspoon salt
• 2 (8 oz.) packages cream cheese, softened
• 20 tablespoons (2 ½ sticks) unsalted butter, softened
• 1 ½ cups sugar
• 2 large eggs
• 2 teaspoons vanilla extract
• 1 cup graham cracker crumbs (see note)
• 3 (20 oz.) cans cherry pie filling, drained
Combine flour, baking powder, and salt in a bowl. With electric mixer on med-high speed, beat cream cheese, butter, and sugar until smooth and creamy, about 2 minutes. Add eggs and vanilla and mix until incorporated. Reduce speed to low, add flour mixture, and mix until just combined. Refrigerate dough until firm, at least 30 minutes.
Adjust oven racks to upper-middle and lower middle positions and heat oven to 350 degrees. Line 2 baking sheets with parchment paper. Place graham cracker crumbs in a shallow dish.
Roll dough into 1 ½ inch balls, then roll in crumbs. Place balls 2 inches apart on prepared baking sheets. Using tablespoon measure, make indentation in center of each ball. Place 3 cherries in each dimple. Bake until golden around edges, 12 to 14 minutes, switching and rotating sheets halfway through baking. Cool 5 minutes on sheets, then transfer to wire rack to cool completely. (Cookies can be stored in airtight container for 2 days.)
*To make graham cracker crumbs, process 8 whole graham crackers in a food processor until finely ground.
Printable Recipe
Download Adobe Reader
 Share on Facebook
Tags: Cherry Cheesecake Cookies
Filed in Cookies, Candies, and Squares | 11 responses so far
Posted by Tara on Monday, January 11th, 2010
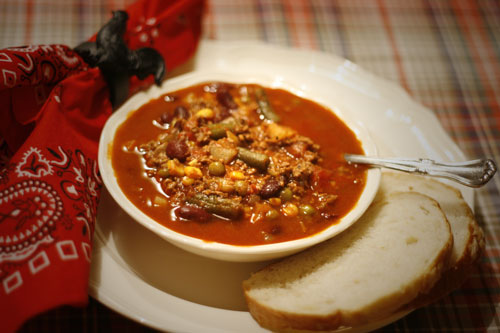
Back in my youth, I worked a couple years at a local restaurant. That was some of the hardest work I’ve ever done in all my life – and for $3.35 per hour! I spent a lot of time filling the +100 item soup and salad bar. The most popular soup we served customers by far, was Chuck Wagon Soup. It was a cross between chili and vegetable beef soup. Although I never spent any time on the trail, I crave this soup when winter brings us the bitter cold days during January.
In honor of all those chuck wagons, that endured the trail and braved the cold, I give you my own version of Chuck Wagon Soup.
• 1 pound ground sirloin
• 1 onion chopped
• 4 NOT BEEF bullion cubes
• 4 cups water
• 1 10 oz package frozen vegetables (corn, peas, carrots, green beans)
• 2 medium potatoes, peeled, diced
• 1 can kidney beans drained
• 1 can petite diced tomatoes
• 3 Tablespoons Chili Powder
• 1 Teaspoon Garlic Powder
• 2-3 Bay Leaves
• Salt and Pepper to taste
Brown the beef with the chopped onion. Drain any excess fat. Add water and NOT BEEF bullion cubes. Bring mixture to a rolling boil to dissolve bullion cubes. Add remaining ingredients and reduce to a low simmer. Let soup simmer 30-40 minutes, stirring frequently. If more liquid is desired, add another cup of water.
This recipe works well in a crock pot. Just brown beef and onions then transfer to a crock pot and add the remaining ingredients. Simmer on low all day or overnight, stirring occasionally.
Printable Recipe
Download Adobe Reader
 Share on Facebook
Tags: Chuckwagon Soup
Filed in Soups and Salads | 5 responses so far


