Posted by Tara on Sunday, May 3rd, 2009

I’m always amazed when I take this salad to a gathering. Most men I know prefer meat over greens any day. But the guys often devour this dish. I think the cashews and bacon entrance the males; they try it, and then come back for more. Testosterone and bacon were meant to be together.
The salad:
-
2 heads broccoli florets, cut into small pieces
-
1 cup of raisins or Craisins
-
1 cup salted cashews (or sunflower seeds)
-
½ cup finely diced sweet onion (I omit this –I am anti raw onions and will tell you why later)
-
6-8 strips cooked crumbled bacon (the more bacon the better)
The dressing:
-
1 cup Hellman’s mayo – sorry folks, there’s no substitute for Hellman’s
-
½ cup apple cider vinegar OR ½ cup lemon juice (I prefer vinegar, but use lemon juice for my brother-in-law Bob)
-
¼ cup sugar OR honey (3-4 Stevia packets for diabetics)
Pour dressing over salad fixin’s right before serving. Rarely are there any leftovers with this dish, but it loses its crunch when stored overnight in the fridge.
Printable Recipe
 Share on Facebook
Tags: broccoli salad
Filed in Side Dishes,Soups and Salads | 2 responses so far
Posted by Tara on Friday, May 1st, 2009
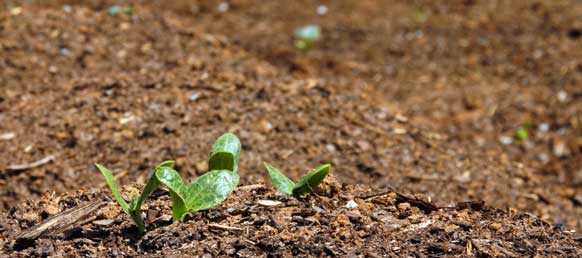
It is exciting to see vegetables sprouting and new life taking form. Lima beans, green beans, squash, and zucchini are all peeking through the soil. Our peppers we started from seeds are really taking off. After a couple more inches of growth, it will be time to transplant them.

We’ve had several beautiful sunny days here in middle TN and the ground has become dusty and dry. Dear hubby purchased a timer for our hose and sprinkler. This will keep our growing darlings moist and hydrated daily.
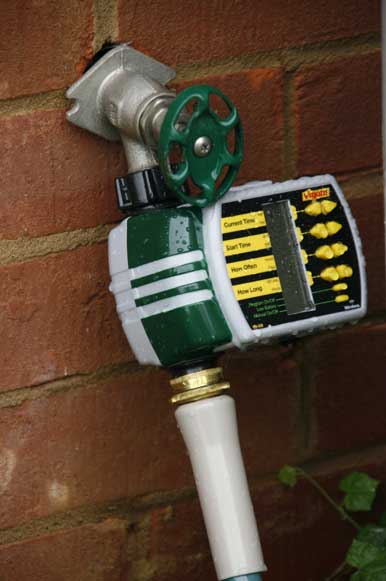
By the way, how many of you folks know what a hose pipe is? Knowing this fact defines one as a true southerner.
Soon taracooks.com will go on location to a worm farm and meet a local worm farmer. I have decided everyone needs a worm farm, especially me. Worms are excellent creatures for those raised bed gardens. They help decompose all the kitchen rubbish we discard. And if one has a worm farm in the back yard – one is always prepared to go fishing.
May is strawberry month. We have some exciting plans for May and strawberries. One of our spring time traditions is to visit a nearby strawberry farm and pick berries together. This year we will feature freezing those berries for morning shakes and how to make strawberry freezer jam for summer time dishes. So stay tuned for more gardening news. Don’t you LOVE this time of year?
 Share on Facebook
Tags: Gardening, raised bed
Filed in Gardening | Comments Off on Spring Sprouts
Posted by Tara on Monday, April 27th, 2009

I’ve never been a fan of coleslaw until I made this one. There are so many flavors that calm the cabbage. The almonds, Craisins, peppers and green onions give it a crazy crunch. This recipe yields a colorful coleslaw which makes a pretty presentation for all those back yard barbeques and garden parties ya’ll have planned this summer. So give slaw one more chance with this recipe. Chances are – you will be won over!
-
1 16 oz package of coleslaw mix (I like the Kroger brand with purple cabbage ‘cuz its pretty)
-
1 cup toasted slivered almonds
-
1 small package or about 1 ½ cups Craisins (dried cranberries)
-
2 stalks finely diced celery
-
1 small green pepper chopped and diced
-
1 bunch chopped green onions (whites and greens)
Dressing:
This coleslaw can be made a day ahead of serving. I mix and store the chopped and diced veggies in a zip lock bag until meal time. The dressing can be made up early too, then poured over the bagged ingredients right before serving.
Printable Recipe
Download Adobe Reader
 Share on Facebook
Tags: coleslaw
Filed in Side Dishes | Comments Off on Crazy Crunchy Coleslaw
Posted by Tara on Friday, April 24th, 2009
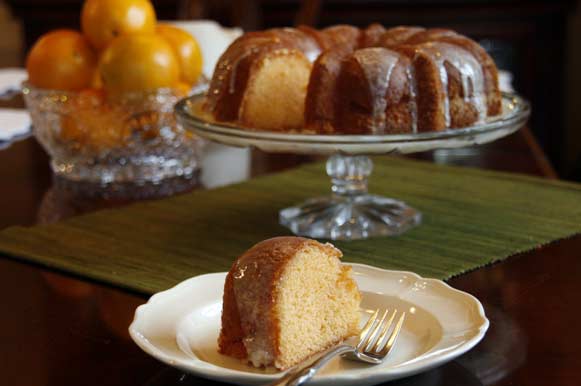
Hey Folks, here is another summer time treat that is served COLD and is pretty easy to make. My mom used to make this and it was one of our family favorites. You can vary this recipe by using different flavors of Jello. It is best when made a day ahead of serving time and allowed to chill in the fridge.
In small sauce pan boil:
When water boils, turn off burner and add 1 small package of orange Jello. Stir to dissolve.
In large mixing bowl mix:
-
1 yellow cake mix
-
4 Eggs
-
¾ vegetable oil
-
Jello mixture
Beat 5 minutes on medium speed.
Pour into greased and floured bundt pan. Bake 350 degrees for 50-60 minutes.
Glaze:
-
½ cup orange juice
-
½ cup powdered sugar
Pour glaze over cake after removing from pan.
(Pictured here is the glazed cake with some thin orange icing. I mixed OJ and powdered sugar and made a thin icing, then drizzled the icing over the cake).
Refrigerate until serving.
Printable Recipe
Download Adobe Reader
 Share on Facebook
Tags: Orange Pound Cake
Filed in Desserts,Pies and Cakes | One response so far
Posted by Tara on Friday, April 17th, 2009

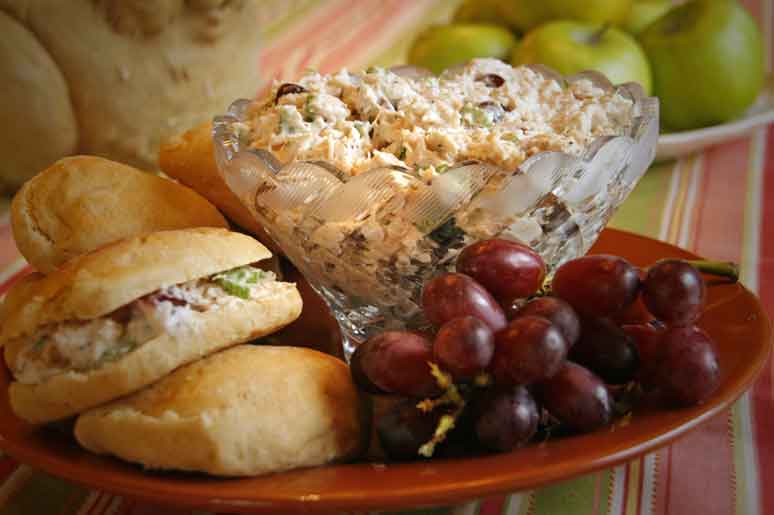 Here’s a quick and easy spring and summer pleaser. When I make this recipe, folks can’t believe it is actually made with canned chicken breast. Sometimes I simply place the chicken salad over a bed of greens. Sometimes I make those pretty little mini pastries. But most of the time, this chicken salad goes on Sister Shubert’s yeast rolls!
In a medium bowl add drained chicken and flake with fork to separate.
Add mayo, celery, grape halves, pecans, celery seed, salt, and pepper. Mix well. Refrigerate until ready to serve. This salad does not last very long at our house!
Printable Recipe
Download Adobe Reader
 Share on Facebook
Tags: Homemade Chicken Salad, organic
Filed in Chicken | 15 responses so far
Posted by Tara on Wednesday, April 15th, 2009
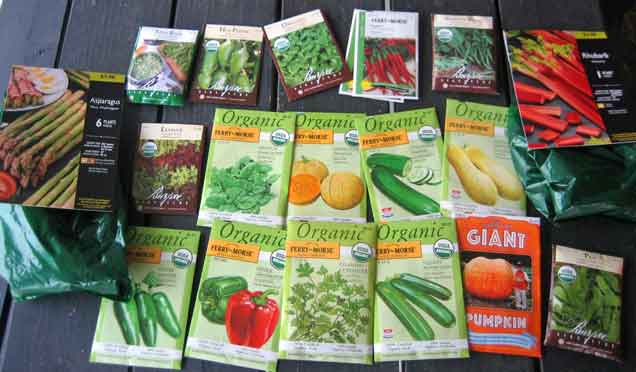
We purchased a variety of organic seeds a few weeks ago. These are seeds from organic fruits and vegetables which have not been subjected to pesticides, chemicals, or any genetic modifications. All these seeds pictured were available at Lowe’s.
Tomato seeds are in short supply this year as well as tomato plants. I was able to find some Bradley tomato plants at Lowe’s. Bradley is a popular variety, which is a choice tomato for canning and preserving J When those tomatoes are ready to harvest, we have big plans for canning here at Taracooks.com!
We were a little over zealous about our plans for the raised garden. All the pepper seeds had to be started indoors. I used some organic potting soil and filled one of those greenhouse containers with green peppers, jalapeño peppers, banana peppers, red hot chili peppers and oregano. The oregano has already germinated (sprouted). After the peppers sprout (14-21 days), I will thin them out. When they grow to about 4” tall, they will need to be planted outdoors.
Here’s what our raised bed looks like after planting seeds on Monday. Some plants require the seeds to be sown in 12” tall hills of dirt. This took more space that we had anticipated. Therefore we only planted 2 hills each of squash, zucchini, cantaloupe, and cucumbers. Next we planted a row of lima beans; followed by a row of blue lake bush beans (bush beans do not require stakes or poles). Notice the 9 tomato plants on the end. They will need staking later.
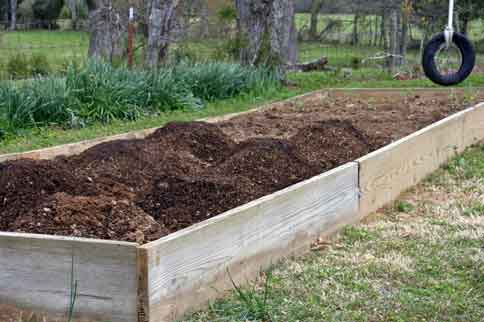

We are going to need to find another area for all those pepper plants, the remaining herbs, asparagus, rhubarb, and spinach. Looks like it’s back to the garden center for a little more topsoil and organic mix.
Hopefully these veggies will sprout soon. A thunderstorm was quickly moving over us as we dropped the last seeds into the ground. God was very eager to work His wonders on the garden Monday. Hopefully some warm sunshine is on its way soon.
 Share on Facebook
Tags: organic gardening
Filed in Gardening | Comments Off on Organic Gardening Update
Posted by Tara on Thursday, April 2nd, 2009

If you’re Tara’s Facebook friend you might have known that we had a surprise we were keeping secret for a little while. Yesterday the Wilson Post featured an article by Ken Beck about TaraCooks.com. Ken and his wife joined us for dinner one evening and we talked about the inspiration, origin and future plans for TaraCooks. On the menu that evening was Playoff Miniburgers, Hilda’s Potato Salad and Old Fashioned Banana Pudding. We had a great evening and enjoyed a wonderful meal.
Click HERE for the text of the article. — OR — Read it on the Wilson Post Web Site.
 Share on Facebook
Tags: Wilson Post Article
Filed in Miscellaneous | Comments Off on Wilson Post Features TaraCooks
Posted by Tara on Thursday, April 2nd, 2009
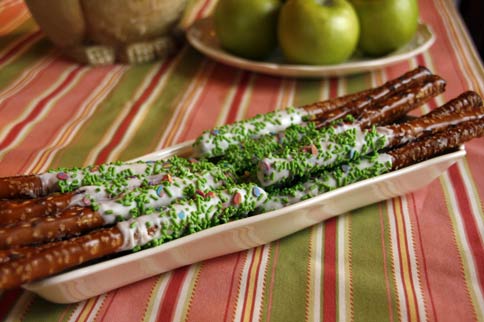
Here is a quick and easy treat suitable for any holiday occasion. Get the kids or grandkids to help with this project. It is a lot of fun.
You will need:
-
½ pound of white or chocolate almond bark
-
1 bag of salted pretzel rods
-
1 jar of festive sprinkles
-
Wax paper
Melt ½ pound of the white or chocolate almond bark in the microwave, being careful not to scorch the mixture. I like to microwave the bark 1 minute at a time, then check it and stir. Repeat process until bark is melted and smooth. Our microwave is pretty strong, so it only takes a couple of minutes to melt.
While chocolate is melting, tear off about 18” of wax paper and place on countertop. Also, pour the sprinkles onto a plate or other flat dish.
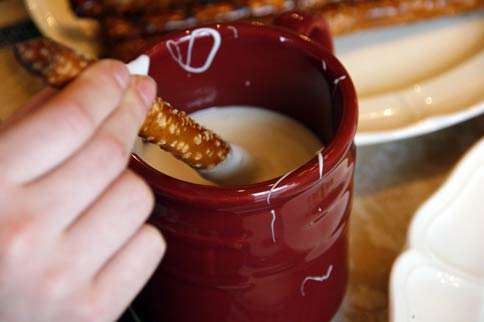
Pour melted mixture into a narrow but deep bowl or mug. I like to use a mug because the kids can hold the mug by the handle with one hand while dipping the pretzel rod with the other hand. Dip the pretzel into the melted chocolate mixture, covering about 1/3 to ½ of each the pretzel rod. Then let the excess melted chocolate drip off the pretzel back into the bowl or mug.
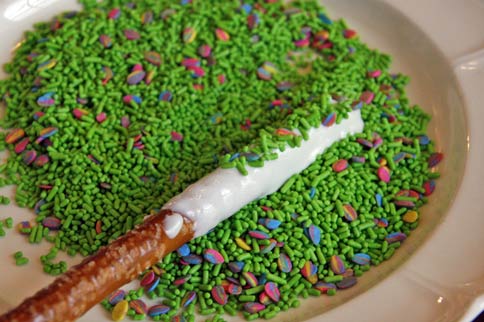
Next roll the dipped end of the pretzel into sprinkles. Then place pretzel on wax paper to harden and set. Repeat process until all the chocolate or pretzels are gone. These store well in large Ziplock bags.
Printable Recipe
Download Adobe Reader
 Share on Facebook
Tags: pretzel sticks
Filed in Desserts,Easter | Comments Off on Festive Pretzel Sticks
Posted by Tara on Saturday, March 28th, 2009

Both my Grandmothers were fantastic Southern cooks. Grandmother Bybee’s first name was Hilda. She was a unique woman, unlike anyone else I’ve ever known. Whenever we had family gatherings with her – she produced quite a spread. She would have 2 of everything. She always made 2 meats like ham AND beef. There were always 2 varieties of beans – green beans AND pintos. She would usually serve both cornbread AND biscuits. Dessert would include cake AND pie. Of course no Southern meal would be complete without potatoes. Granny didn’t disappoint us in the potato selection either. Mashed potatoes AND potato salad would always be on her dinner table for us.
Although I normally love green peppers and onions – I do NOT; repeat NOT, like them in my potato salad. That’s what we all love about this recipe – no peppers or onions. I have yet to taste any other potato salad recipe that comes close to the taste of Grandma Hilda’s. . After a few tweaks through the years, I am ready to reveal the best potato salad recipe here at Taracooks.com. Even our kids get excited about this recipe and are asking me to make more.

- 6-7 medium Idaho potatoes, peeled and cut into 1”cubes
- 6-7 hardboiled eggs, peeled and grated
- 1 cup Hellman’s Real Mayo (there is NO substitution here)
- 1 teaspoon salt
- 1 ½ teaspoons celery seed
- ½ teaspoon celery salt
- 1 large Clausson grated dill pickle (about 1/3 cup)
- 2 Tablespoons dill pickle juice
First – bring about 8 cups water to a boil in a large pot. Add diced potatoes and reduce heat to low boil. Let potatoes boil about 10-15 minutes or until they are tender when forked. Remove from heat, drain, and rinse them gently in cold water. Set potatoes in fridge to cool while preparing eggs.
In a medium pot, boil 8 cups of water. Then ladle eggs, one at a time into the boiling water. Unless eggs are extremely large, boil them for 12 minutes. Remove from heat, drain and let the eggs set under cold running water for a couple of minutes. I like to remove the shells as soon as the eggs are cool enough to handle – otherwise the shells tend to form suction on the eggs and are harder to remove. Grate eggs and set aside.
Next grate a large (1”x5”) dill pickle. The taste won’t be the same if you use pickle relish or a different brand of pickles. But that’s your call.
In a large bowl add cooked potatoes, grated eggs, and grated pickle. Gently fold eggs and pickle into potatoes. Sprinkle salt, celery seed, and celery salt over potato mixture. Add mayo and pickle juice. Gently fold mayo into potato mixture. Refrigerate until ready to serve. Ideally – the potato salad is better the next day. Transfer to a pretty dish to serve.
Download Adobe Reader
 Share on Facebook
Tags: organic, Potato Salad
Filed in Side Dishes | Comments Off on Hilda’s Potato Salad
Posted by Tara on Thursday, March 26th, 2009
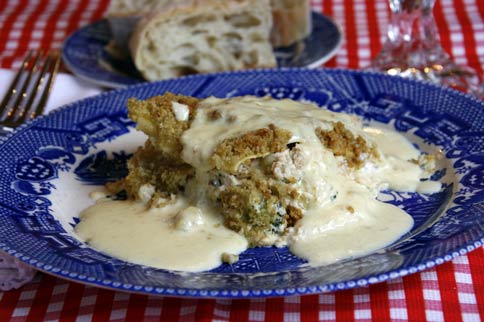
Here’s another hearty generous recipe from Karen and it fills a 9×13 pan. This dish is even better the day after it is made. I wanted to freeze a portion for another meal, but there wasn’t enough left to freeze!
Chicken Lasagna Bake is a versatile recipe. If you don’t like red pepper, just omit it. Do your kids hate broccoli? Substitute zucchini or spinach instead. Next time I make this, I think I will toss in ½ cup chopped mushrooms.
Instructions:
8 oz lasagna noodles (I love to use Barilla Lasagna no boil noodles. Therefore, I increased the chicken broth from 1 cup to 2 cups over the original recipe. You could also use the pre-boil noodles. You would need to boil the noodles according to package directions, drain them, and then rinse noodles in cold water before assembling the Chicken Lasagna Bake. Just remember to decrease the chicken broth to1 cup if your noodles are already cooked).
In medium mixing bowl combine and set aside:
-
1 can cream of chicken soup (undiluted)
-
2 cups chicken broth (for pre-boiled noodles use 1 cup)
-
½ teaspoon salt
-
Pepper to suit your taste
In large mixing bowl combine and beat on medium speed until smooth:
Add the following ingredients to the cheese mixture:
-
1/3 cup chopped onion
-
1/3 cup chopped green pepper
-
1/3 cup chopped red pepper
-
¼ cup finely chopped parsley
-
1 cup finely chopped and cooked broccoli florets
-
3 cups cooked chicken –chopped or shredded (I pour a generous amount of Italian Dressing over 4 chicken breasts and bake at 400 about 30 minutes)
Combine and set aside:
Lightly grease a 9×13 pan. Preheat oven to 375 degrees. Line bottom of pan with a layer of noodles. Pour half of the soup/broth mixture over noodles. Then spread half of the cheese/veggie mixture over soup/broth. Next, spread half the chopped/shredded chicken over cheese/veggie mixture. Add another layer of noodles. Add remaining soup/broth mixture, followed by remaining cheese/veggie mixture. Then spread the other half of the chopped/shredded chicken over the cheese/veggie layer. Top with a final layer of noodles. Sprinkle top layer of noodles with buttered breadcrumbs. Place in oven and bake at 375 degrees for 30 minutes.
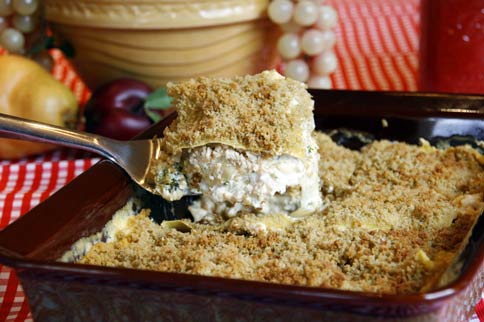
Cut lasagna into 12 equal portions. Place a portion on plate and ladle Alfredo sauce over the Chicken Lasagna Bake right before dining! Enjoy and repeat often!
Download Adobe Reader
 Share on Facebook
Tags: chicken lasagna bake
Filed in Casseroles,Main Dishes | Comments Off on Chicken Lasagna Bake


 Here’s a quick and easy spring and summer pleaser. When I make this recipe, folks can’t believe it is actually made with canned chicken breast. Sometimes I simply place the chicken salad over a bed of greens. Sometimes I make those pretty little mini pastries. But most of the time, this chicken salad goes on Sister Shubert’s yeast rolls!


