Posted by Tara on Sunday, December 22nd, 2019
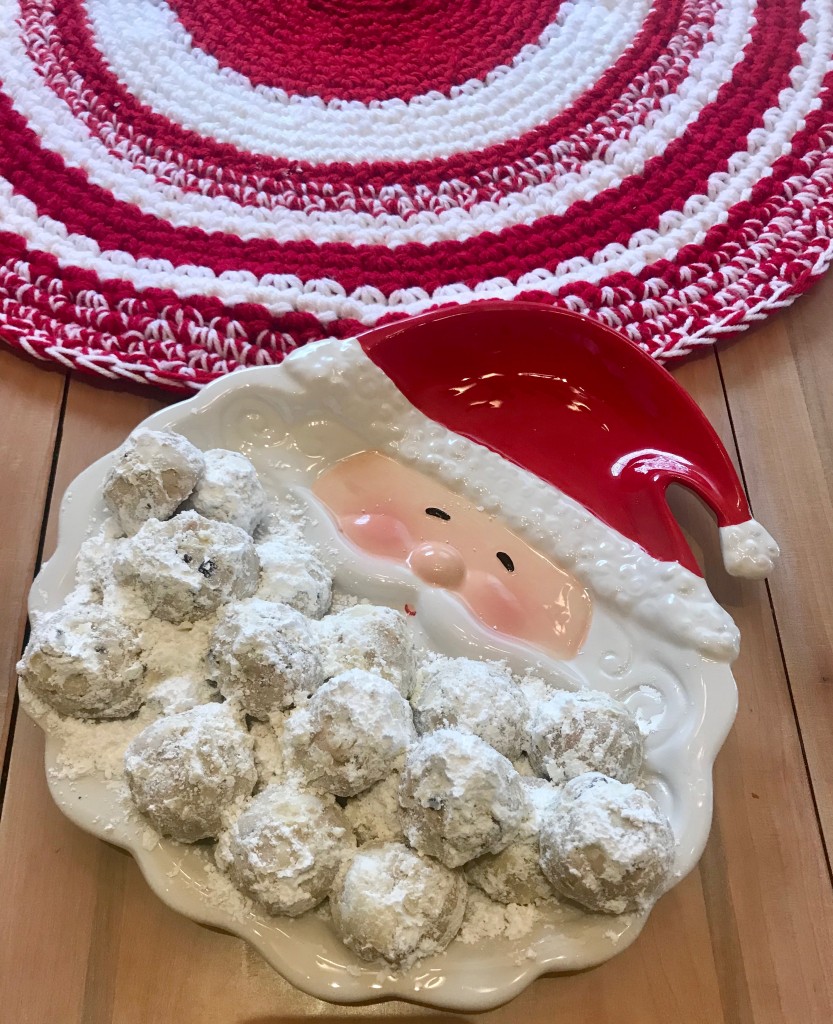 Since adopting 3 Ukrainian siblings this year, I have been researching Ukrainian and Russian recipes to add to our meal rotation. They are more likely to enjoy their native foods than American food. I agree. Ukrainian food is healthier and most often tastes better than the standard American foods we are accustomed to. I was delighted to learn that my mother’s Pecan Sandie Cookie recipe is identical to Russian Tea Cookies! The kids liked these a lot! They are so pretty and festive. And they are pecfect for a Santa tray.
- 2 sticks soft butter
- 1/2 cup powdered sugar
- 1 Tablespoon vanilla
- 2 cups all purpose flour
- 1/4 teaspoon salt
- approximately 1 1/2 – 2 cups powdered sugar for dusting the cookies after baking
- 1 cup finely chopped pecans (optional)
Beat butter on medium speed for 2 minutes until light and fluffy. Add the half cup sugar and mix another minute. Add the vanilla and mix. Add the flour 1/2 cup at a time, mixing after each addition. Add the pecans. Remove dough from bowl and form dough into a round ball. Chill the dough for 2 hours. Preheat oven to 350 degrees. Remove chilled dough from refrigerator. I used a 1 oz cookie dough scoop to form cookie balls, finishing each ball by rolling the dough between palms of my hands. Place cookie balls on parchment lined baking sheet. Bake at 350 degrees approximately 16-18 minutes, or until balls begin turn slightly golden. Remove cookies from oven and immediately begin rolling each ball in a bowl of powdered sugar, fully coating each cookie. Cookies are best when fresh, and can be stored in plastic bags or closed containers for a couple of days.
I could not work well with the chilled dough and ended up allowing it set out and return to nearly room temperature. Then I could easily form the balls. Also our kids do not like pecans. I divided the dough in half, and added pecans to half the dough and proceeded to bake half with pecans and half without the pecans. Both varieties were very tasty.
 Share on Facebook
Tags: #russianteacookies #snowballcookies #spanishweedding cookies #pecansandies #christmas
Filed in Christmas,Cookies, Candies, and Squares | Comments Off on Russian Tea Cookies
Posted by Tara on Saturday, March 17th, 2018
- 2-3 pound corned beef with spice packet
- 2 Tablespoons brown sugar
- salt and pepper to taste
- fresh chopped parsley
- 1 pound small potatoes washed and halved
- 2 carrots – washed and cut into 2″ chunks
- 1 small head of cabbage, outer leaves removed, head cut into quarters
- 1 cup water
Place the corned beef in the Instant pot with the fat side downward.
Rug the top and sides of the corned beef with the brown sugar.
Sprinkle the contents of the seasoning packet over the top of the brown sugar and press.
Add salt and pepper to taste.
Pour 1 cup water in Instant Pot.
Manually set pressure to high and time to 80 minutes.
After 80 minutes, release pressure, remove lid, and add the potatoes, carrots and cabbage quarters. Sprinkle a little salt over the vegetables.
Close lid and push pressure valve to the locked position.
Manually set pressure to high and cooking time to 20 minutes.
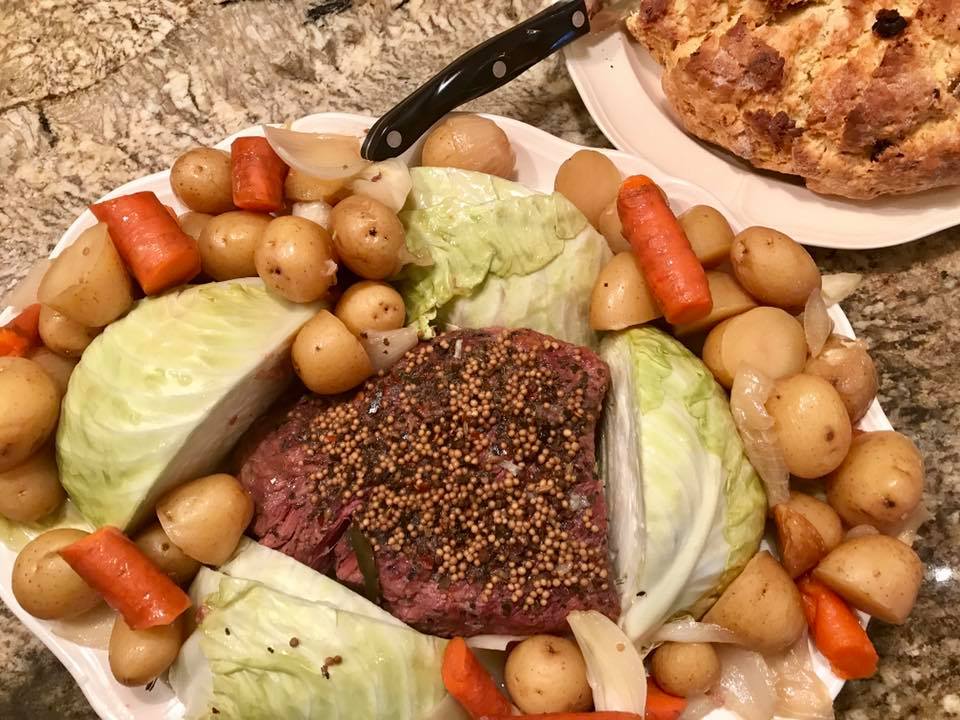
Transfer veggies and meat to serving platter. Cut corned beef against the grain for best results. Garnish with fresh chopped parsley.
Share on Facebook
Tags: corned beef, instant pot, st. patrick's day
Filed in Beef,Instant Pot,Main Dishes,St. Patrick's Day | Comments Off on Instant Pot Corned Beef
Posted by Tara on Monday, February 5th, 2018

2.5 pounds chicken thighs
1 can Rotel tomatoes
2 8 0z cans green chilies
1 sliced onion
1 32 oz box chicken broth
1 teaspoon cumin
2 teaspoons garlic powder
1 teaspoon salt
1 teaspoon pepper
1 cup uncooked rice (not instant)
Place ingredients into Instant pot in order listed. Seal lid and set pressure to high, manual cook for 35 minutes. Release pressure, remove lid, and break apart the chicken thighs. Then add 2 15 oz cans of drained white or navy beans. Stir and serve hot with toppings such as Monterey Jack cheese, sour cream, cilantro, dice jalapeño peppers, or salsa.
Share on Facebook
Filed in Chicken,Instant Pot,Soups and Salads | Comments Off on Instant Pot Chicken Chili Stew
Posted by Tara on Sunday, January 3rd, 2016

Make this cake but don’t tell anybody that it is gluten and sugar free. It’s delicious! The chocolate cake layers are inspired by Trim Healthy Mamma’s Celebration Cake. I added the monk fruit and used Swerve sweetener in place of Super Sweet Blend. I reduced the cooking time for my convection oven. I created a coconut filling and topped it all with a sugar free chocolate gnash. It didn’t last long here.
For the cake:
- 1 cup coconut flour
- 1/2 cup flax meal
- 1/2 cup cocoa
- 1/2 cup Swerve or Erythritrol
- 1/4 cup Monk Fruit
- 2 teaspoons baking powder
- 2 teaspoons baking soda
- 10 large eggs
- 1/2 cup melted coconut oil
- 15 oz can coconut milk (full fat, not light)
- 2 teaspoons vanilla extract
Preheat oven to 350 degrees. Spray two 8″ round cake pans with cooking spray and lightly sprinkle pans with cocoa to dust and coat them. In a large mixing bowl add the coconut flour, flax meal, sweeteners, cocoa, baking soda, and baking powder and blend together with a wire whisk. In a blender add the eggs, coconut oil, coconut milk, and vanilla then pulse to blend well. Add the wet mixture to the dry ingredients. Stir to blend well then let mixture set about 5 minutes. Divide the batter equally between the 2 pans. Bake layers for 20-25 minutes or until toothpick inserted comes out clean. Let layers cool completely before removing them from pans.
For the coconut filling:
- 15 oz can coconut milk (unsweetened, full fat)
- 1 teaspoon vanilla extract
- 1 teaspoon coconut extract (optional)
- 1/2 cup Swerve sweetener or Erithrytrol
- 6oz package fresh frozen unsweetened coconut
In a medium sized sauce pan add the coconut milk and the sweetener. Turn heat to medium -medium high and let mixture come to a gentle boil. Whisk frequently and allow mixture to continue at a low boil until liquid is reduced by half – approximately 8 oz. Add the most of coconut and flavorings and let mixture cook 2-3 more minutes. Reserve a couple Tablespoons of coconut for garnish on top of cake. Mixture should be about the consistency of pudding when cooled.
Place one of the cake layers on a cake plate and spread the coconut mixture over the top allowing some of the mixture to run over and down the sides. Place the other cake layer on top of the coconut mixture. Prepare chocolate gnash after placing top cake layer over coconut mixture.
For the chocolate gnash:
- 1 12 oz package Hershey’s Sugar Free Chocolate Chips
- 2 Tablespoons coconut oil
- 1 teaspoon vanilla
Place chocolate chips and coconut oil in a medium sized microwave safe bowl. Microwave a minute at a time, stirring after each minute, until mixture is smooth and chips are melted. Add the vanilla extract. Pour the chocolate gnash over the top layer, allowing some of the mixture to run down the sides of the cake. Garnish top of cake with extra coconut. Allow gnash to cool completely before serving. This cake refrigerates well.
Share on Facebook
Tags: chocolate cake, coconut, dairy free, Gluten Free, mounds, sugar free
Filed in Desserts,Gluten Free,Pies and Cakes | Comments Off on Don’t Tell Mounds Cake
Posted by Tara on Sunday, December 6th, 2015
Here’s a tasty holiday treat which I’m featuring gluten-free. Regular plain flour can also be substituted for the gluten-free flour. Either way, the combination of cranberry, orange, chocolate, and nuts is a special festive combination.
- 1 cup sugar
- 1 cup soft butter
- 2 egg yolks
- 2 1/4 cups gluten free flour blend
- 1/2 teaspoon vanilla
- 1 teaspoon orange flavor
- zest of 1 orange
- 1/2 cup dried cranberries – finely chopped
for the chocolate dip:
- 1 12 oz package semi-sweet chocolate chips
- 1/2 stick butter
- 1/2 teaspoon vanilla
- 1 teaspoon orange flavor
garnish:
- chopped walnut piece
- orange zest
Preheat oven to 350 degrees.
In a large mixing bowl cream the butter and sugar until fluffy. Next, add the egg yolks to the butter and sugar mixture. Beat until mixture is fluffy. Add the vanilla, orange flavor orange zest and mix well. Add the chopped cranberries and the flour. Mix well and refrigerate dough about an hour. Roll dough into 1/4 inch thickness on floured wax paper. Cut cookies with a cookie cutter and place on cookie sheet to bake. Bake about 10 minutes or until edges begin to brown. Remove cookies from oven and allow them to cool completely.
To make the chocolate dip, add the chocolate chips, vanilla, orange flavor and butter to a microwave safe bowl. Microwave a minute at a time, stirring after each minute, until mixture is melted and smooth. Dip cooled cookies about half way into the chocolate. Place dipped cookies on wax paper and sprinkle with finely chopped walnuts and/or orange zest.
Share on Facebook
Tags: Christmas, cookie, cranberry, Gluten Free, sugar cookie
Filed in Cookies, Candies, and Squares,Gluten Free | Comments Off on Cranberry Orange Sugar Cookie – Gluten Free
Posted by Tara on Wednesday, November 18th, 2015

Alright folks, this pumpkin pie is to die for and rounds out my fall menu quite nicely. Refrigerated pastry crust teams up with a gingersnap crust for a delicious foundation for the perfect pumpkin pie.
- 1 refrigerated pie crust
- 2 cups crushed gingersnaps (about 40 gingersnaps)
- 1 cup pecans, finely chopped
- 1/2 cup sugar
- 1/4 cup butter, melted
- 1 (15-oz.) can pumpkin
- 1 (14-oz.) can sweetened condensed milk
- 2 large eggs, beaten
- 1/2 cup sour cream
- 1 teaspoon ground cinnamon
- 1/2 teaspoon vanilla extract
- 1/4 teaspoon ground ginger
Preheat oven to 350°. Place piecrust into a 9-inch deep-dish pie plate according to package direction, fold edges and flute.
Mix together crushed gingersnaps, pecans, sugar, and butter. Reserve 2/3 cup mixture for garnish when serving. Press mixture on bottom and up sides of piecrust.
Bake at 350° for 10 minutes. Remove double crust from oven and let cool about 30 minutes.
Stir together pumpkin, condensed milk, eggs, sour cream, cinnamon, ginger, and vanilla until well blended. Pour into prepared crust.
Bake at 350° for 30 minutes. Sprinkle Pecan Streusel around edge of crust. Bake 40 to 45 minutes or until set, shielding edges of pie with foil during last 20 minutes of baking.
Serve pie warm with a dollop of real whipping cream sprinkled with cinnamon. Garnish pie with reserved gingersnap crumbs.
Printable Recipe
Share on Facebook
Tags: pie, Pumpkin Pie, southern, Thanksgiving
Filed in Pies and Cakes,Thanksgiving | 9 responses so far
Posted by Tara on Sunday, August 30th, 2015

Here’s a sinful dessert for the peanut butter lovers. What could be better than graham cracker crust and peanut butter filling topped with real whipped cream, chocolate syrup and peanut butter cups?
For the crust:
- 2 cups graham cracker crumbs
- 1 stick melted butter
- 2 Tablespoons sugar
Pour melted butter into a pie pan. Add graham cracker crumbs and sugar. Mix well and press mixture into pie pan.
For the filling:
In a large mixing bowl beat:
- 1 8oz package of softened cream cheese
- 1 cup peanut butter
- 2 cups powdered sugar
- 1 Tablespoon vanilla
- 1/2 cup real whipping cream
Using a hand or stand mixer, cream the cheese and peanut butter together. Add the powdered sugar, vanilla, and whipping cream and beat 2 minutes on high speed or until mixture is light and fluffy. Pour filling into prepared crust. Chill pie in refrigerator a couple of hours or more before serving.
Top pie with the following items when ready to serve:
- Whipped Cream
- Hershey’s syrup
- Reese’s Peanut Butter cups cut into pieces
Share on Facebook
Filed in Desserts | Comments Off on Peanut Butter Pie
Posted by Tara on Tuesday, July 7th, 2015

- 1 12 oz can refried beans
- 8 oz smoked beef brisket
- 1/2 cup sour cream
- 1/2 cup salsa or BBQ sauce
- 1 cup shredded sharp cheddar cheese
- Toppings:
- 2 Tablespoons fresh cilantro
- 2 Tablespoons fresh chopped green onions
- 2 Tablespoons jalopeno peppers
- 1 bag corn chips
Light about 30 charcoal briquettes. Prepare nachos while charcoal is heating. In a 10 camping style Dutch oven layer the ingredients in the order listed, saving toppings and corn chips until ready to serve. Cover Dutch oven and place it over 10 prepared charcoal briquettes, and then place 20 briquettes on top of the lid. Cook for 15 minutes, then rotate the lid a quarter turn clockwise and the bottom a quarter turn counter clockwise. Cook another 10-15 minutes or until cheese is melted and lightly browned. Garnish with the cilantro, onions, and peppers. Serve with corn chips. This recipe can be gluten free – just be sure there are no hidden gluten sources in the refried beans, sauce, or chips.
Share on Facebook
Tags: Beef, brisket, campfire, camping, Dutch Oven, Gluten Free, Nachos
Filed in Appetizers,Beef,Gluten Free | Comments Off on Campfire Brisket Nachos
Posted by Tara on Wednesday, July 1st, 2015

Roasted Tomatoes
Preheat oven to 325
In a Dutch Oven, or casserole dish with glass lid add:
- 4 boxes of cherry or grape tomatoes (approximate weight 12-16 oz box)
- 1 teaspoon sea salt
- 1 Tablespoon fresh rosemary leaves
- 1 Tablespoon fresh thyme
- 4-5 cloves pressed garlic
- 1/2 – 3/4 cup olive oil
Stir to coat tomatoes with oil and herbs. Cover tomatoes. Cook 2-3 hours, stirring occasionally, until tomatoes have begun to brown on top.
Spoon onto Ciabatta , Asiago Cheese, or your favorite bread. Garnish with fresh grated Parmesan or Romano cheese. Also tasty served with Pita Chips and over Italian Roast Beef Sandwiches.
Printable Recipe
Download Adobe Reader
Share on Facebook
Tags: Roasted Tomatoes
Filed in Appetizers | One response so far
Posted by Tara on Sunday, June 28th, 2015
- 1 pound lean ground beef
- 5 oz can evaporated milk (can use 2/3 cup coconut or almond milk for dairy free)
- 1 can mild Rotel drained tomatoes
- 2/3 cup chili sauce, or BBQ sauce or ketchup –
- 1 Tablespoon dried minced onion
- salt and pepper to taste
- ½ stick melted butter
- 1/2 cup water
- 1 pound fresh green beans, washed, tips and strings removed, cut into 2” pieces
- 4-6 new potatoes, washed and quartered
- 1 garden fresh onion – peeled and quartered
- Salt and black pepper to taste
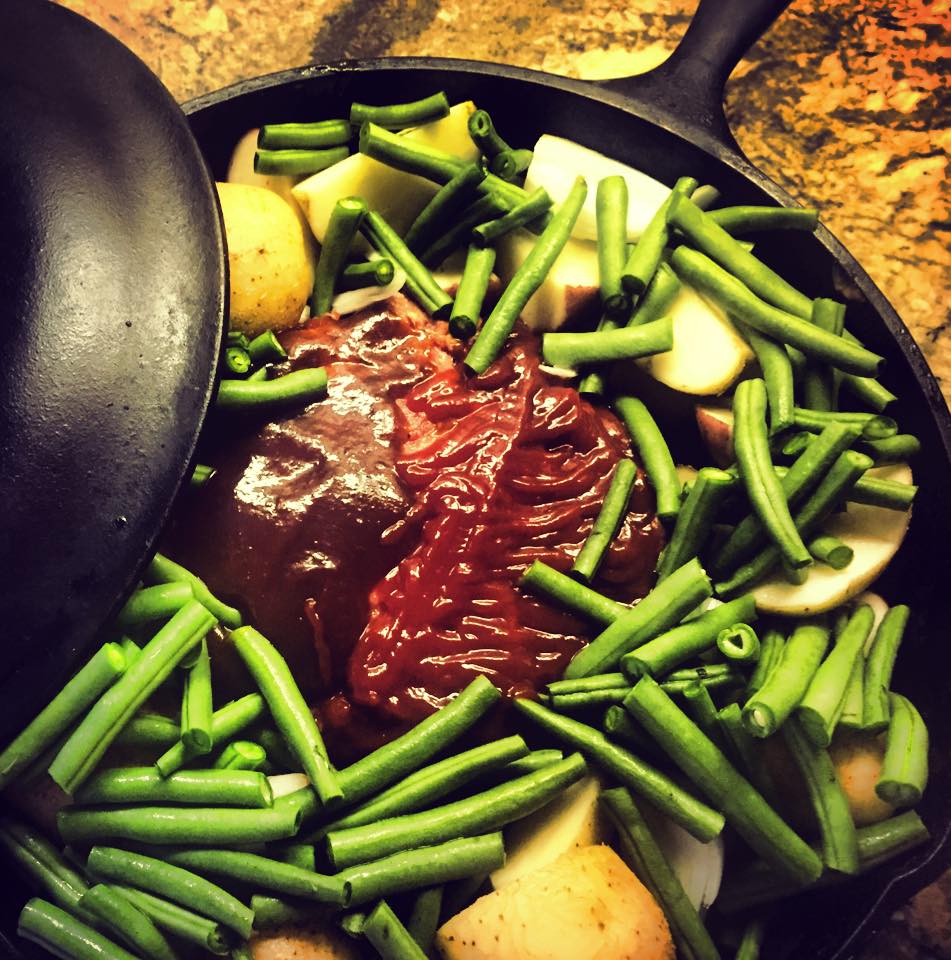
In a large bowl combine the beef, milk, tomatoes, chili sauce (or BBQ or ketchup), minced onion, and salt and pepper to taste. Form meat into a round loaf about 2” thick and 5” in diameter. Place loaf in the middle of a 10-12” iron skillet or Dutch oven. Cover meatloaf with BBQ sauce or ketchup. Add the quartered new potatoes, quartered onion, and the fresh green beans, placing them around the meatloaf. Add salt and pepper to the potatoes and green beans. Pour melted butter and water over the veggies. Bake the dish at 400 degrees for 40-50 minutes or until meat is done and veggies are tender.
Share on Facebook
Tags: meatloaf, skillet meal
Filed in Beef,Casseroles,Healthy Cooking,Main Dishes | Comments Off on Meatloaf Skillet Meal


