Posted by Tara on Monday, September 12th, 2011
I just love my Grandmother. She recently celebrated her 93rd birthday and assured me that she has lived a LONG time. Although she has slowed down a bit in recent years, her mind is as sharp as a tack. And her sharp mind is complimented by her quick wit. She makes me laugh out loud.
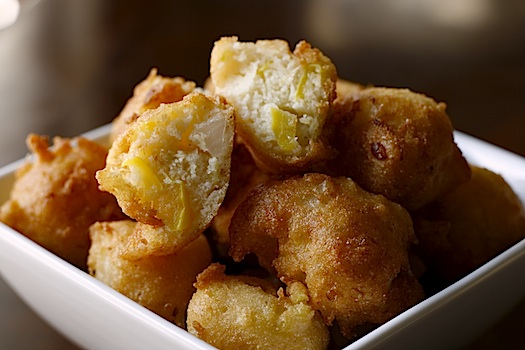
I wanted to share with you one of her recipes for Squash Puppies which is perfect for Meatless Monday. I could certainly make a meal with these little puppies but they are wonderful served up with meatloaf, fried catfish, or with fried okra, sliced tomatoes, and dried beans. Serve them any way you want, but serve them soon!
- 5 medium yellow squash – diced
- 1 beaten egg
- 1/2 cup buttermilk
- 1 medium onion – chopped
- 3/4 cup self rising corn meal
- 1/4 cup plain flour
- 1 teaspoon seasoned salt
- 4-6 cups oil for frying (I use peanut oil)
Add the diced squash to a medium microwave safe dish. Add 1 cup water to the squash. Microwave squash on high power for 5 minutes. Prick squash with a fork to check tenderness. If squash is not very tender, continue to microwave squash in 2 minute increments until squash is tender. Then transfer squash to a colander. Press squash to squeeze out excess juice. Let squash set for about 2 minutes then press any remaining liquid from the squash.
In a large mixing bowl, add the drained and pressed squash along with the beaten egg, buttermilk, corn meal, flour, diced onion, and seasoned salt. Mix inredients with a large spoon to blend well.
In a pan suitable for frying, add the 4 cups of oil. Preheat oil to approximately 400 degrees. Use a 1 oz cookie dough scoop to scoop the batter and carefully drop it into the hot oil. Continue filling pan leaving about an inch of space between each squash puppy. An 8″ pan will hold approximately 7-8 puppies at a time. Fry squash puppies about 5 minutes or until golden brown. Puppies will float to the top of the oil and most will flip over on their own during frying, allowing even browning. Use tongs to flip any unturned puppies. When squash puppies are golden brown, use tongs to remove them from hot oil and let them drain on paper towels. Continue cooking the rest of the batter and serve squash puppies while they are still hot.
The kids prefer to dip these in ketchup. However lemon aoli or cocktail sauce make nice compliments to this dish.
 Share on Facebook
Filed in Breads, Doughs, and Crusts,Meatless Monday,Side Dishes | 3 responses so far
Posted by Tara on Friday, September 9th, 2011
This post is for all of my frugal minded cooking friends who like coffee treats and are tired of spending big bucks for a Venti concoction. In my opinion Starbucks should be called Fivebucks because that’s about what is will cost for a Venti sized drink. If you feel that 5 bucks is too many bucks to shell out for a drink, especially on a regular basis, make your own java and give iced coffee a try.
These iced coffees are incredible and can be made with left over coffee! That’s right, before throwing out any coffee which was not consumed, grab a glass jar or other storage container and save that coffee by placing it in the fridge. By making your own iced coffee once a week, you can save yourself over $250 a year.
Since our firstborn roasts and grinds raw coffee beans for us, we get an extra special treat. I’ve yet to have coffee that tastes better than his does. I like to make a whole 12 cup pot of coffee, let the coffee cool, then refrigerate it. I use one heaping tablespoon of fresh roasted, fresh ground coffee per cup and fill the coffee pot with the correlating amount of water.
Sometimes I like to add some ground cinnamon to the coffee grounds for a “pumpkin spice” flavor. Sometimes I add a couple of tablespoons of cocoa for that delightful “mocha” taste. And real vanilla extract added to the fresh grounds creates a soothing taste. Once the coffee brews and is chilled, you only need to add ice, condensed milk as sweetener, and a little heavy cream to suit your taste buds. Hershey’s syrup makes a nice mocha iced coffee, and a drop of peppermint oil with the Hershey’s syrup creates a peppermint mocha flavor that is incredible. There’s no scientific recipe here. Just add enough condensed milk to suit your own tastebuds. For a 1 quart jar of coffee I like to add 2-3 Tablespoons of condensed milk.
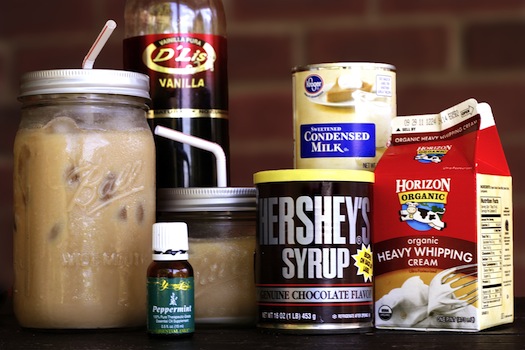
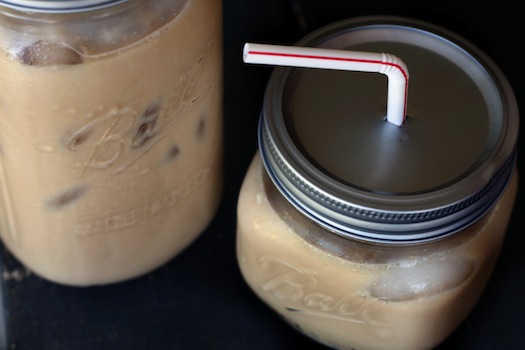
Finally, I like to serve iced coffee in these cute Ball wide mouth jars in quart size for that “Venti” portion, or pint size for a smaller treat. I save old canning lids for such purposes as this and use a screwdriver to poke a hole in the center. This way TO GO portions of your favorite iced coffee can be made ahead of time and stored in fridge. Next morning you can just grab and go and there’s no paper or styrofoam container needed which would later end up in the land fill.
 Share on Facebook
Filed in Beverages,Frugal Friday | 4 responses so far
Posted by Tara on Monday, September 5th, 2011
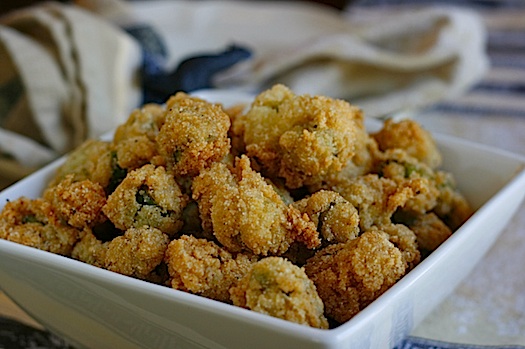
One of my favorite traditional Southern dishes is Fried Okra. Honestly, I could make a meal with Fried Okra. Fresh okra makes the best fried okra. I grew up picking okra from my paternal and maternal granparents’ gardens as well as our own family garden. And I picked up a batch at the farmers market to make this “mess of okry” as my grandmother would call it.
A “mess” of okra would be enough to feed a family of 4-6. About 4 cups of fresh okra is a good start – enough to fill a large mixing bowl within a couple inches of the top. I like to rinse the okra in cold water and place it on a clean dish towel then blot it dry. Next the caps or tops get lobbed off with a sharp knife. Cutting the tips off is optional. In my opinion they are fine to eat, but don’t turn out as pretty as the cut sections from the middle of the okra. Finally I like to cut the rest of the okra into about 1/3-1/2 inch rounds.
- 4 cups fresh okra, caps and tips removed, cut into 1/2″ round pieces
- 2 cups buttermilk
- 2 cups self rising corn meal
- 2 teaspoons seasoned salt
- 4-6 cups of oil for frying
Place okra pieces in a large mixing bowl. Pour buttermilk over okra and toss okra with a large spoon to coat it with the buttermilk. Let okra have a buttermilk bath for 5-10 minutes. Then pour contents of bowl into a colander to drain the excess buttermilk. Mixture will most likely appear slightly slimey but don’t fret over this. It’s all good!
In a deep fryer or suitable pan for frying, add the oil and preheat fryer or pan to approximately 375 degrees. For best frying results, fill deep fryer to fill line or fill pot with about 4″ of oil. While oil is heating, finish preparing the breading for the okra:
Place the corn meal and seasoned salt in a gallon Zip Lock container. Add about 1 cup of the okra, zip bag closed, then shake the bag to coat the okra. Remove coated okra and place in a large clean dry dish or bowl. Continue breading the okra with the corn meal mixture until all okra has been coated.
When oil has preheated, carefully add about 2 cups of the breaded okra to the hot oil. Using a fryer basket that comes with the deep fryer is an easy way to handle to okra, fry it in oil, and remove the okra from oil. If using a pan on stove top method, use a large slotted metal spoon to ladle okra into oil. Okra will cook quickly and should turn golden brown in about 4-6 minutes. Remove okra from oil by lifting the basket from the fryer or using a slotted metal spoon to lift okra from pot on stove top. Carefully place hot fried okra on layers of paper towels to absorb excess oil. Okra is best served right away, but can be kept crisp under the broiler unit of the stove on a low setting for a few minutes. Kids love this with Ketchup!
 Share on Facebook
Tags: Fried, Okra, old fashioned, southern
Filed in Meatless Monday,Side Dishes | 2 responses so far
Posted by Tara on Monday, August 29th, 2011
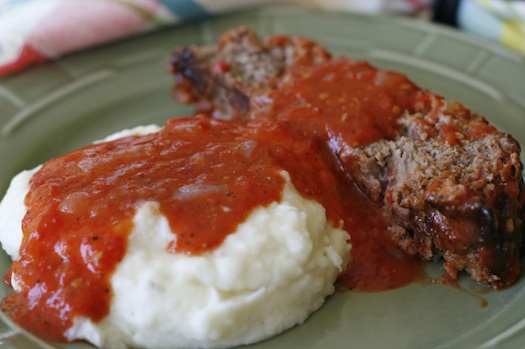
I can’t believe its Monday again which means here at Taracooks.com its time for another Meatless Monday post. Today’s feature is Old Fashioned Tomato Gravy. The recipe is simple and quick and the gravy can be served over hot biscuits, mashed potatoes, or even some meatloaf! I used garden fresh tomatoes and pureed them right before pouring the tomatoes in the skillet. However canned tomatoes would work just as well I am sure. And don’t be afraid of the bacon drippings in this recipe. It really is the key ingredient – other than the tomatoes.
- 1/4 cup bacon drippings
- 1/2 cup chopped sweet onion
- 4 Tablespoons plain flour
- 2 teaspoons salt
- 1 teaspoon pepper (or more to taste)
- 4 cups crushed tomatoes (fresh or canned)
In a large iron skillet, heat the bacon drippings over medium heat. Add the chopped onion and saute a minute or two until the onions begin to turn translucent. Add the flour and salt, and pepper, stirring constantly with a wire whisk until flour just begins to lightly brown. Slowly pour in the crushed or pureed tomatoes while continuing to whisk. Stir frequently as mixture heats to a low boil. Let gravy bubble for about 5 minutes, stirring frequently. Pour over hot biscuits, mashed potatoes, meatloaf or even noodles and serve right away. Prepare for lots of lip smackin’!
 Share on Facebook
Tags: Gravy, meatless, old fashioned, southern, tomato, tomato gravy
Filed in Meatless Monday,Pork,Pork,Uncategorized | 5 responses so far
Posted by Tara on Thursday, August 25th, 2011

I debated wheather to let this post stand alone as a regular, or include it as a Frugal Friday post. Now I know you can drop by Little Ceaser’s on Friday evening and pick up a cheap premade pizza. And there are times when we all have to do so. However, the males around here would place Bacon Cheeseburger Pizza in the “gourmet” category. Since we can dish up a gourmet style pizza in our own kitchen for considerably less $$ than ordering one at fine pizzaria, this pizza is a perfect match for a Frugal Friday post.
This pizza is hands down my husband’s favorite. What makes it special is the sauce, which is a far cry from traditional tomato based sauce. The sauce is made by blending mayo, mustard, and dill pickle relish together and spreading the mix over home made pizza dough that has been partially cooked. The pizza gets topped off with ground beef, cheddar cheese, crumbled bacon, and some fresh lettuce and tomatoes. Eating Bacon Cheeseburger Pizza is like having two favorite American foods in one meal.
We like to make our own crust, or you can certainly use the canned or premade crust. Then you will need:
- 1 cup Helmman’s Mayo
- 1/4 cup regular Mustard
- 1/4 cup dill pickle relish or diced dill pickle
- 2 Tablespoons Worchestershire Sauce
- 1 pound of ground beef – browned and drained
- 1 teaspoon salt
- 1 teaspoon pepper
- 6 pieces cooked crumbled bacon (save drippings to grease pizza pan)
- 2 cups shredded cheddar cheese
- 1-2 cups shredded lettuce
- 1 large sliced fresh tomatoe
- one sweet onion sliced or diced
- 1-2 fresh sliced jalapeno peppers (optional)
Mix together in a medium sized bowl the mayo, mustard, Worchestershire sauce, and dill pickle relish. Set aside.
Brown ground beef and drain any excess grease. Add salt and pepper.
Cook bacon in microwave or in a skillet. Let bacon cool on paper towels and blot excess grease from bacon. Save drippings.
Use bacon drippings to grease pizza stone or pan. Roll dough to edges of pan and prick with fork. Place pan into a 450 degree preheated oven. Cook 5-7 mintues or until top begins to brown. Remove pizza pan from oven and top pizza crust with the mayo mixture. Then add the ground beef and cheddar cheese. Return pan to oven and cook another 5-7 minutes until cheddar cheese begins to turn bubbly and golden brown. Check bottom of pizza crust and remove pizza from oven when the browness of crust suits your personal preference. Top pizza with fresh lettuce, onion, tomatoes, crumbled bacon, and peppers if desired.
 Share on Facebook
Tags: bacon, cheeseburger, pizza
Filed in Appetizers,Beef,Breads, Doughs, and Crusts,Main Dishes | 4 responses so far
Posted by Tara on Monday, August 22nd, 2011
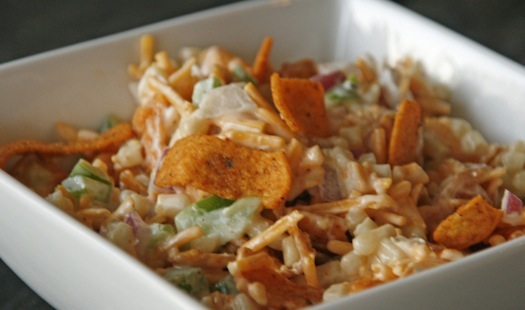
There are some strange recipes for sure that I run across from time to time – so strange that I have to make the recipe myself to believe it could actually be tasty. While recently visiting our friend Deborah, she raved on and on about a corn salad made with Chili Cheese Frito’s. I actually don’t care for Frito’s and would never have bought the Chili Cheese Frito’s. But Deborah was very convincing and I am so glad she was. Because this is one of our new summer time favorite salads! The flavors of the corn, peppers, onions, and cheddar play well together. The Chili Cheese Frito’s add a nice pizzaz too.
This recipe is a nice addition to Meatless Monday posts because it could easily stand alone as a meal for me. I have also served this salad over a bed of salad greens with chopped tomatoes and jalapeno ranch dressing, And next time I make this salad, I am going to toss in some crumbled bacon into the mix!
- 2 11 oz cans shoepeg corn – drained
- 1 medium green pepper – chopped
- 1 medium purple sweet onion – chopped
- 1 cup Hellman’s Mayo (I mixed half regular and half light)
- 8 oz package sharp cheddar cheese
- 1 10 oz bag Chili Cheese Frito’s
- 1/2 cup crumbled bacon pieces
Drain corn and place in a Rubbermaid or Tupperware bowl. Add the chopped peppers and onions. Cover salad mixture and refrigerate at least 2 hours or overnight. Add the mayo and cheese and mix well, and return to refrigerator. When ready to serve transfer salad mix to a large serving bowl and add the Chili Cheese Frito’s and crumbled bacon if desired. Stir and serve immediately.
This recipe makes more than our family can eat at one meal and does not keep well in the refrigerator afterwards. I have easily halved the recipe. I have also served the corn chips is a separate bowl and let family memebers top their corn salad when they serve themselves. This way we can better enjoy any leftovers.
 Share on Facebook
Filed in Meatless Monday,Soups and Salads | 4 responses so far
Posted by Tara on Friday, August 19th, 2011
Today is Friday which means the topic of the day is fugality. One way we save money on our grocery budget is by making our own laundry detergent. (I include detergents and house hold cleansers in our grocery budget.) And this is a project our kids enjoy doing.
I must admit, that I was skeptical- very, very skeptical about the whole home
made laundry detergent issue. But I kept on reading user reviews which raved
about the cheap costs and the wonderful results and thought I’d give it a try.
Many of the online recipes for home made laundry detergent instruct the maker
to add quite a bit of water to the dry ingredients in a 5 gallon bucket – which
could later be poured into an empty liquid TIDE container. I wasn’t crazy about
storing 5 gallons of soap, and trying to pour it from a 5 gallon container into a
small one. I was thrilled to find one review that recommended just mixing up the
dry ingredients, and adding about 2-4 Tablespoons of the mixture to the washing
machine – just like one would add the store bought detergent. At that point – I
was SOLD on the idea.
Here’s what you will need:
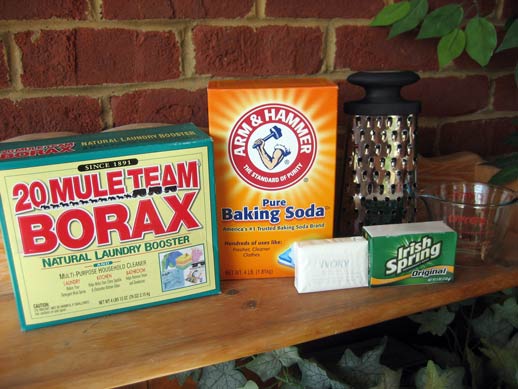
- 1 Box Mule Team Borax
- 1 Large Box Arm and Hammer Washing Soda (baking soda is pictured, but this is the size box needed)
- 6 Bars of Soap. The soap will determine the fragrance.
Take a newspaper and spread it out. Open the bars of soap and grate each one
over the newspaper. I used the large grate side of my hand grater and the soap
was fairly easy to grate. Since this project is more like an experiment, I selected
IVORY and IRISH SPRING soaps and kept them separated.
Next, I added 1-2 cups of grated soap to my MAGIC BULLET and finely chopped
the soap a little more. I repeated this process until all the grated soap had some
time in the MAGIC BULLET. Since I’m making a dry batch of laundry detergent
instead of liquid, I felt this was a needed step. If you don’t have a MAGIC
BULLET, try a blender or food processor.
In a large dish tub or bowl mix 11 cups Borax and 11 cups washing soda and the 6
bars of grated, chopped soap. Since I used 2 varieties of soap, I divided my
Borax and soda in half and added 3 bars of chopped Ivory to half, then repeated
this step with the IRISH SPRING. I simply stirred to mix everything well. Then I
poured the finished detergent into a large ZIP LOCK BAG.
I use 2-4 Tablespoons of detergent per load, depending on the size of the load,
or how dirty the load is.
Always check your washer manufacturer instructions when selecting detergents. I have an HE washer and have been using this home made detergent with no problems. But the instructions say to purchase and only HE products. Finally, some folks may not be able to find washing soda and use baking soda in the recipe. But never use washing soda for cooking purposes!
 Share on Facebook
Tags: laundry detergent
Filed in Miscellaneous | 11 responses so far
Posted by Tara on Monday, August 15th, 2011
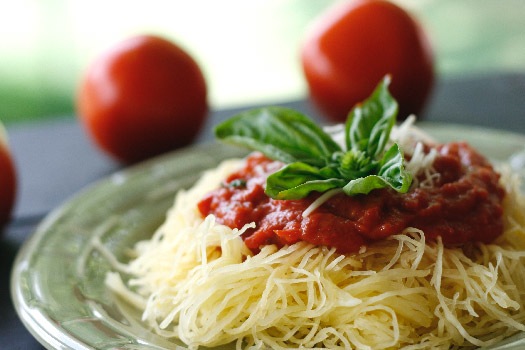 Monday is here again which means it is time for a meatless post. Take a good look at this photo. Is that spaghetti, the traditional pasta for marinara? It may look like pasta, but it isn’t. It’s spaghetti squash cooked in the microwave then topped with some left-over 20 Minute Marinara. If you are looking for ways to serve a meatless meal – give spaghetti squash a try. It’s quick. It’s easy and quite nutritious too. And it mimicks the taste of spaghetti.
1 spaghetti squash is all that is needed to yield 2-3 cups of noodles. Simply prick the squash a number of times with a fork. Place whole squash in the microwave and zap it for 6-8 minutes then turn the squash over and cook it for another 6-8 minutes. Carefully remove squash from microwave and cut in half lengthwise. Use a spoon to scoop out noodles then remove the seeds. Add a little salt, or garlic salt, butter, and pepper to taste. Serve with marinara, alfredo, or meat sauce. Top with fresh parmesan cheese and fresh basil.
 Share on Facebook
Tags: meatless, spaghetti squash
Filed in Italian,Low Cal / Low Carb,Main Dishes,Meatless Monday | 4 responses so far
Posted by Tara on Friday, August 12th, 2011
One way we save money on our grocery budget is by making the switch from sodas to water. Soda typically costs nearly $2.00 with tax for a 2 liter bottle. The cost per ounce is higher on canned soda, or individual bottles. And the most outrageous cost is for the individual chilled bottles at the checkouts. If we drank soda every day, my grocery budget for a family of 5 would easily increase by $20 or more per week. Drinking soda would cost my family over $1000 per year. I could plan a family vacation to the beach each year by drinking water and ditching the soda. Another bonus is that water is a much healthier choice.
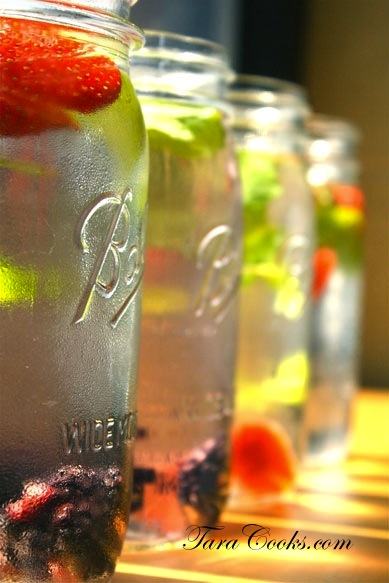
Here’s a repost on making your own flavored waters with fruit. I find making flavored waters quite refreshing in these hot summer months. And my water bottle is like a best friend to me. It goes where I go so I rarely need to pay nearly $2.00 for chilled bottled water at the checkout. So have I convinced you to make the switch and save the difference? Your body and wallet will thank you!
Everyone needs to drink lots of water. A lack of water can lead to dehydration, fluid retention, and even headaches. Soda has long been the GO TO thirst quencher for many Americans, but water is a much healthier choice. Sodas are full of high fructose corn syrup which puts the pancreas into overdrive. Diet soda may be sugar free, but the chemical sweeteners are increasingly under scrutiny for their links to various cancers.
Ideally, one should consume anywhere from 6-10 8oz glasses of water a day, more if you are athletic. If you have trouble drinking enough water each day, why not try adding some fruit or herbs to quart jars of water for some pizzaz?
Before bedtime, add a few strawberries, blackberries, or raspberries to a couple of quarts of filtered water along with some mint leaves. Then place the jar in the refrigerator to chill overnight. Wash and slice some lemons, limes, or oranges and add the slices to a jar of filtered water. Or mix some lemon slices with strawberries. Toss a couple of frozen peach slices and pineapple chunks into a jar along with some lemon slices. Try fresh basil leaves with peaches for an interesting duo. The combinations are endless. The flavors of the fruit and herbs becomes stronger over time. Experiment a little to find an intensity of flavor that tickles your tastebuds. Let’s all commit to trade in our soda for water. Our bodies will thank us!
 Share on Facebook
Tags: fruit water, healthy, water
Filed in Beverages,Frugal Friday,Healthy Cooking | 5 responses so far
Posted by Tara on Friday, August 5th, 2011
I’m thinking of starting some new lines of posts. Since today is Friday and frugalness is on my mind, I would like to share some tips on what we do to help save money on our grocery bill around here. And I welcome your comments if you have anything to add. I may even have some of my frugal friends work up a guest post here at Taracooks.com in the future.
We all are aware that our economy is struggling, and has been since 2008. It was May of 2008 that my husband’s position was eliminated and it took him 18 months to find permanent employment. I tell him often that is one experience I do not care to ever have to repeat. We are still in recovery mode – anyone who has seen my mini van with the handles duct taped to the doors knows what I’m talking about. We have been frugal out of necessity and I am sure many of the Taracooks.com readers are kindred spirits to us in this respect.
So today I want to share some ways I reduce our grocery bill and still try to maintain a healthy diet. I welcome comments at the end of the post. And PLEASE let me know if you would like to work up your grocery saving methods and share here on a future frugal Friday.
PLAN – I always spend less money when I go to the grocery with a plan of action. If I spend some time browsing the store ad’s online first and plan our meals around the meat sales, I save money.
PRESERVE – Summer is a busy time here, although home school is not in session. I freeze, can, and preserve as much summer harvest as possible. I also make a couple trips to KY to the Mennonite country. If I can take a friend it is worth the hour drive and the gas to get fresh produce at a discount price. And it makes a fun day trip too.
ALDI – I LOVE ALDI! I make a couple trips a month to ALDI to stock up on staples I know we will use every week. Eggs are often 29cents a dozen. Real butter is the cheapest of all at ALDI as well as their NOT FROM CONCENTRATE ORANGE JUICE. I also watch for their fresh blueberry sales in the summer months. At 49-99 cents a pack, I can afford to buy in bulk and freeze a year’s supply for our morning shakes, blueberry waffles, and blueberry crumb pie! I also bought a couple of flats of strawberries for 99 cents a quart pack and froze those for use throughout the next year. I can’t go pick the berries myself for the ALDI’s prices.
BAKE FROM SCRATCH – I love to make up my own mixes and seasonings from scratch. This saves us money and is healthier. The kids love my pancake/waffle mix which can be stored in the freezer and used a cup at a time for a small batch. Home made ranch dressing mix is much cheaper than store bought. I also love to make my own taco seasoning, pie crusts, and biscuits. Pie crust and biscuits can be made in multiple batches and frozen for convienience cooking later.
So I’ve shared 3 ways I have found to save money at the grocery. I am looking for more ways so please feel free to share your comments with us! Happy Frugal Friday everyone!
 Share on Facebook
Tags: Frugal, grocery budget, money saving
Filed in Uncategorized | 6 responses so far


