Posted by Tara on Monday, October 17th, 2011
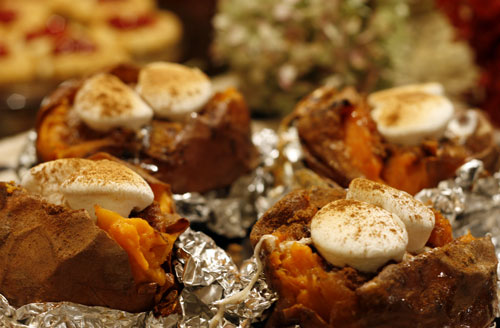
Here’s a pleasing side dish that is much easier to make than sweet potato casserole and is a tasty way to welcome fall. Just wash some large sweet potatoes, and wrap them in foil. Then bake them at 425 degrees for about an hour, until potatoes are soft when you squeeze them. Next remove foil, slice potatoes lengthwise and fluff the sweet potato a bit. Add a generous portion of real butter to each potato, 2-3 Tablespoon dark brown sugar, a couple of shakes of cinnamon, then top each sweet potato with a few miniature marshmallows. Return loaded sweet potatoes to oven and broil until marshmallows are a toasty golden brown. Grandmother Bybee always served white beans with her sweet potatoes. I think loaded sweet potatoes can also stand alone as a meal. Either way – they are a WINNER!
Printable Recipe
Download Adobe Reader
 Share on Facebook
Tags: baked sweet potato, fall, Loaded Sweet Potato, Thanksgiving
Filed in Meatless Monday,Side Dishes | One response so far
Posted by Tara on Thursday, October 13th, 2011
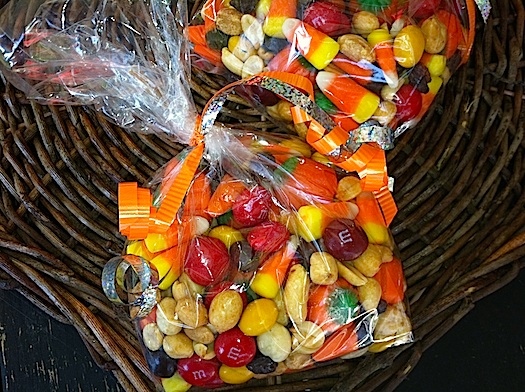
We really do try to eat healthy. But we indulge occasionally in some festive treats that are family traditions. I’ve made this Autumn Mix for years. It can be varied to suit your own taste. The peanuts provide some protein and the raisins some fiber. The M&M’s and Brach’s candy corn are only good for the soul. This mix performs a disappearing act before our eyes. And the mix serves a decorative purpose too because it is so colorful. Finally it can be measured and bagged, and tied with a festive ribbon to be given as a gift to teachers, friends, or coworkers. And there’s no baking required!
1 24 oz bag Brach’s Autumn Mix (has pumpkins, regular and chocolate candy corn)
1 16 oz jar lightly salted dry roasted peanuts
2 cups raisins (optional)
1 12 oz bag fall M%M’s candy pieces (plain, peanut, peanut butter, whatever your preference).
Mix all ingredients together in a large mixing bowl. Store in an airtight container until ready to use.
 Share on Facebook
Tags: autumn mix, candy corn, fall, halloween mix
Filed in Cookies, Candies, and Squares,Halloween,Miscellaneous | One response so far
Posted by Tara on Monday, October 10th, 2011
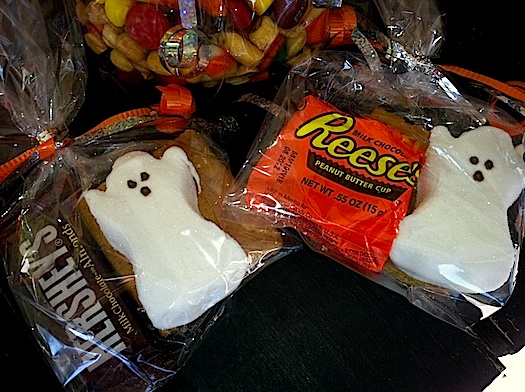
Are you a teacher who needs treat ideas for the fall? Are you a fan of S’mores like we are? If you answered YES then Spook-Tacular S’mores can be individually packaged and ready for a fall party or to hand out to any little spooks who ring your doorbell in search of sugary loot!
I was so excited to find that PEEPs has expanded their marshmallow treat line to include these adorable little ghosts as well as pumpkins and monsters. I found 3 packs of these cute Peep ghosts at Wal-greens but have also seen them at Fresh-Market and Kroger. We LOVE Reese’s Peanut Butter Cup S’mores so I made a basket full of Spook-Tacular S’mores with half Reese’s cups and the other half Fun Size Hershey Bars. I found the bakery/treat bags in the cake decorating ailse of Wal-mart. Assembling the treat bags is easy. Each bag gets 2 graham cracker squares, a Peep ghost, and a fun size chocolate treat of choice. Then the bags get tied and sealed with festive ribbon. These treat bags turned out so cute – almost as cute as my niece and nephews!
 Share on Facebook
Filed in Cookies, Candies, and Squares,Miscellaneous,Uncategorized | 3 responses so far
Posted by Tara on Thursday, September 29th, 2011
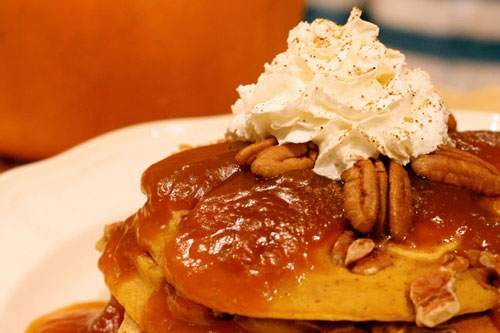
What could be better on a crisp fall morning than my own creation of Pumpkin Pie Pancakes served with hot Pumpkin Maple Syrup? Pumpkin Pie Pancakes for dinner! Trust me, these pancakes are worth the effort! And serving pancakes for dinner once a week is another Frugal Friday tip!
3 cups All-purpose Flour
2-½ teaspoons Baking Powder
½ teaspoons Baking Soda
1 teaspoon Salt
3 Tablespoons Sugar
2 teaspoons Cinnamon
1 teaspoon Cloves
½ teaspoons Nutmeg
3 whole Eggs, Well Beaten
1 cup Canned Pumpkin
3 cups Buttermilk
1 cup Chopped Pecans
1 Tablespoon Vanilla
1 stick Butter, Melted
2 cups Maple Syrup
2 cups Canned Pumpkin
Real Whipping Cream
For the pancakes:
Preheat a griddle to 350 degrees. While griddle preheats, make the pancake batter.
Combine and sift the flour, baking powder, soda, salt, sugar, cinnamon, cloves, and nutmeg together in a large bowl. Set aside.
Combine the pumpkin, eggs, buttermilk, vanilla, and melted butter in another bowl. Then combine wet ingredients with dry ingredients.
Pour 1/2 cup batter for each pancake onto preheated griddle. Cook 1-2 minutes on each side (or until golden brown), flipping only once. Serve with hot Pumpkin Maple Syrup with a dollop of real whipping cream. Garnish with cinnamon and nutmeg.
For the Pumpkin Maple Syrup:
In a medium saucepan add 2 cups Maple Syrup and 2 cups canned pumpkin. Stir with a whisk and cook over medium high heat until mixture begins to boil. Continue to cook for about 5 minutes or until mixture begins to thicken, stirring frequently. Reduce heat to low and keep syrup warm until pancakes are ready to serve.
Makes 12 6″ pancakes.
 Share on Facebook
Tags: pancakes, pumpkin pancakes, pumpkin syrup
Filed in Breads, Doughs, and Crusts,Breakfast,Frugal Friday | 4 responses so far
Posted by Tara on Wednesday, September 28th, 2011
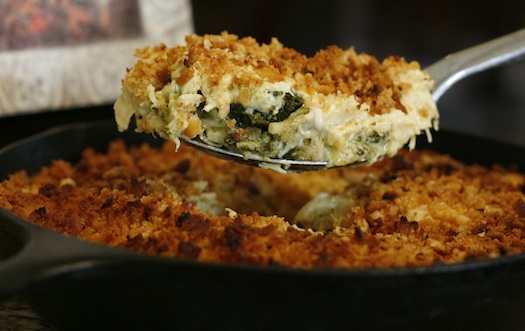
Here’s a tasty recipe for the hurried cook made with canned chicken breast, and bagged broccoli. Add some cream of chicken soup, shredded cheddar, and a buttery cracker crumb topping and dinner is prepared in a snap! And this casserole is perfect for these chilly fall evenings. Too bad we didn’t have any leftovers when I made this.
- 2 12 oz cans chicken breast – drained and flaked
- 1 bag fresh broccoli florets – stems removed and cut into small bite sized pieces
- 1 can cream of chicken soup
- 2 cups grated cheddar cheese
- 1 teaspoon curry powder (optional, but the kids here like it)
- 1 teaspoon black pepper
- 1 teaspoon onion powder
- 1 tube (about 2 cups) crushed Ritz crackers
- 1 stick butter – melted
Place cut broccoli in a microwave safe dish and microwave 2-3 minutes or until broccoli is slightly tender. Drain any liquid. Transfer broccoli to a buttered 2 quart casserole dish or buttered 10″ iron skillet. Next mix the canned chicken, cheese, cream of chicken soup, and spices together in a large bowl. Pour mixture over broccoli. Then in a medium sized bowl, mix the cracker crumbs with the melted butter. Top the broccoli and chicken mixture with the buttered crumbs. Bake in a 400 degree preheated oven 20-30 minutes or until topping is golden brown. Serve while casserole is warm.
 Share on Facebook
Filed in Uncategorized | 6 responses so far
Posted by Tara on Monday, September 26th, 2011
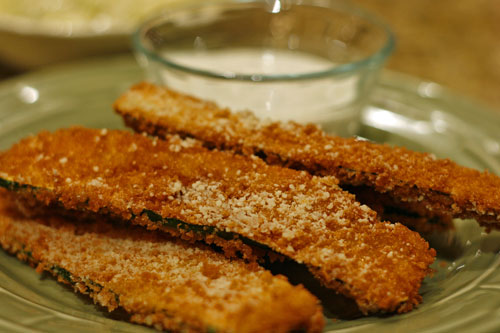
One of our favorite places do dine on a special occasion is Maggiano’s. My favorite menu item is a simple appetizer – Fried Zucchini! Although Maggiano’s recipe remains a secret – I’ve come pretty close to duplicating this favorite and couldn’t wait to share it. I am also tempted to use yellow squash in place of zucchini one of these days. Meanwhile, I give you THE RECIPE!
• 3 medium zucchini – washed, stems removed, sliced lengthwise into thin pieces.
• Panko Bread crumbs for breading – poured into a shallow 9×9 dish.
Batter:
• 1 ½ cups club soda
• ¾ cups plain flour
• ½ cups corn starch
• 1 teaspoon seasoned salt
• 1 teaspoon onion powder
• 1 teaspoon course ground pepper
Mix soda, flour, starch, salt, onion powder, and pepper together and pour into a shallow 9×9 dish. Dip zucchini strips into batter. Then dip the strips into the Panko bread crumbs, coating each side. Place battered strips onto paper towels.
In a large skillet, pour vegetable oil 1” deep. Heat oil over medium high flame. Add battered zucchini and fry for 2-3 minutes or until golden brown on bottom side, turn zucchini and repeat. Drain on layers of paper towels. Shake Parmesan Cheese over fired zucchnin right before serving. Serve hot with Lemon Aioli dipping sauce.
LEMON AIOLI DIPPING SAUCE:
• ½ Cup Hellman’s Mayo
• ½ Cup Sour Cream
• Zest of one lemon
• Juice of one lemon
• ½ teaspoon Dill Weed.
Whisk all together in small bowl. Serve with Fried Zucchini. Yum!
Printable Recipe
Download Adobe Reader
 Share on Facebook
Tags: aioli, Fried Zucchini, lemon, maggiano's
Filed in Appetizers,Meatless Monday | 30 responses so far
Posted by Tara on Thursday, September 22nd, 2011
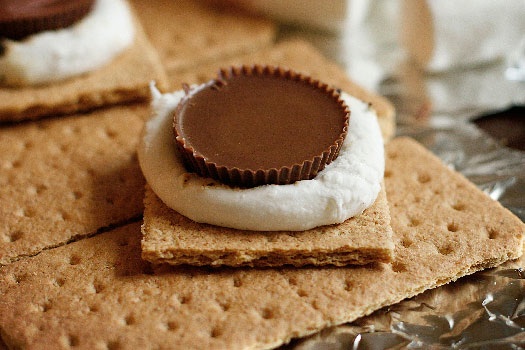
When I updated my Facebook status last week to, “Just had my first S’more of this season – a Reese’s Peanut Butter S’more” I had many people comment that they have never tried one. This recipe is too good not to share with others. I consider it one of my top contributions to humanity. And in my opinon, the only thing better than a traditional campfire S’more, is one made with a Reese’s Peanut Butter cup!
If you don’t have access to a campfire, you can always zap the marshmallow in the microwave, or go Red Neck style and use a blow torch like we did for the S’mores in this post!
You will need:
- Graham Cracker Squares – 2 squares for each S’more
- 1 bag of Jet Puff Marshmallows (regular size)
- 1 Package of Reese’s Peanut Butter Cups, unwrapped and removed from paper cup
Now S’mores are best when the marshmallow is roasted over a real campfire until golden brown. Some folks prefer a “charred” flavor, but to each his/her own. So get those graham cracker squares and unwrapped peanut butter cups ready. Then roast or toast that marshmallow over a campfire. If rain is about to stop you from having the best S’more experience of your lifetime, by all means, plop a marshmallow on top of a graham cracker and nuke that baby until it puffs up. Place fire roasted marshmallow on top of a graham cracker, then place a peanut butter cup on top of the marshmallow. If you prefer, give your S’more a top, or if you can’t waste any more time to bite into ooey gooey peanut butter heaven, then serve yourself an open faced S’more. REPEAT as often as necessary!
What I’ve learned about S’more making:
Nabisco regular flavor graham crackers in the RED box are my favorite. I’ve tried generic and honey grahams, but they just don’t seem as fresh as Nabisco in the RED.
When I bought the new Jet Puff SQUARE marshmallows, designed specifically for S’mores, the kids at a camp out led a revolt against me. They just don’t puff up and fill out like the round ones do. So now I just stick with the regular shape.
Those GIAGANTIC super duper extra large marshmallows are fine for roasting, but are over kill for making a S’more. There’s too much marshmallow which over powers the graham cracker and chocolate or peanut butter cup. They are too large for a graham square, which allows the marshmallow to ooze out of the crackers and onto your hands, or chin, or chest, or lap. You get the picture?
You’ve gotta make these soon. And consider other ways to top off your S’more. Sometimes we use Hershey bars with almonds, or Mr. Good Bar or Hershey’s Special Dark. Make it a family fun evening filled with tasty happiness.
 Share on Facebook
Tags: camping, peanut butter cup, s'more
Filed in Cookies, Candies, and Squares,Desserts,Uncategorized | 7 responses so far
Posted by Tara on Tuesday, September 20th, 2011
Last month I had a “hen party” here at the house. For those of you not familiar with Southern talk – “hen party” refers to a gathering of females for any named purpose which includes lots of laughing (clucking) and gabbing, good food, great friends and often the selling of some product said females think they need. The recent chick fest was advertised as a girls “Fondue Night” and an old friend Heather Wamble brought her delightful collection of My Thirty-one purses to show us the new fall line.
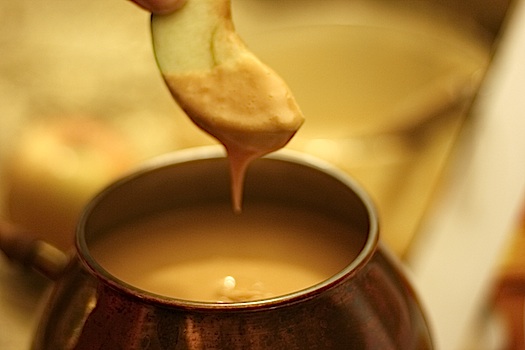
Honestly, I had never made fondue in my life. Not once. Not ever. The only fondue that ever touched my lips was at the Melting Pot Restaurant when we had a gift card to pay for the outing. After viewing all different types of fondue, I decided to make an Italian Cheese Fondue for dipping veggies and bread. And to satisfy the sweet teeth present, I came up with my own version of a salted caramel fondue. The salt is a perfect balance to the sweetness and a nice compliment to tart apple slices, pound cake, frozen cheese cake bites, pretzels, and gingerbread. A small crock pot works as well as a fancy fondue pot for the fondue. But for the photo I was able to borrow from Jane a vintage 1960’s copper fondue pot complete with a can of Sterno.
This stuff can be zapped in the microwave for a few minutes and transferred to a mini crock pot or regular fondue pot. Then just have a load of apple slices, pound cake, gingerbread, cheese cake or whatever else you think would be tasty drenched in salted caramel heaven. And this method will be much cheaper than taking the family to The Melting Pot!
- 2 bags Kraft Caramels or Kraft Caramel Bits (you don’t have to unwrap the bits!)
- 1 5 oz can evaporated milk
- 1 10 oz bag mini marshmallows
- 2 teaspoons salt
Unwrap caramels and place in a large microwave safe dish. Add the milk and microwave a minute at a time, stirring after each minute, until caramels melt forming a smooth sauce. Then add the marshmallows and stir into the warm sauce until they are melted and well blended. Microwave fondue another minute if you needed to melt the marshmallows. Add the salt and transfer fondue to mini crock pot or a fondue pot. If there are any left overs mixture can be stored in refrigerator and reheated later in the microwave by cooking a minute at a time and stirring after each minute until mixture is smooth and creamy.
 Share on Facebook
Tags: caramel, fondue, salted
Filed in Desserts,Uncategorized | 5 responses so far
Posted by Tara on Monday, September 19th, 2011

Black Eyed Pea Salad
It’s Monday again and time for another Meatless Monday post. I’ve never really been a fan of black eyed peas, but this salad is incredible. Before passing judgement – be brave, be bold, and try it!
I served this as a salad, but you could also serve it as a salsa/dip along with corn chips. Either way, you can’t go wrong.
Dressing:
- 1/2 cup olive oil
- 1/2 cup red wine vinegar
- 1 teaspoon celery salt
- 1 teaspoon fine ground black pepper
Salad:
- 1 sweet red pepper, cored, sliced, and diced
- 1 sweet green pepper, cored, sliced, and diced
- 1-2 fresh jalepeno peppers, cored, seeded, sliced, and diced (if you love HOT, leave some seeds)
- 1 peeled, cored, diced cucumber
- 1 bunch green onions, chopped
- 2-3 stalks celery, chopped and diced
- 2 cans drained black eyed peas
Prepare dressing, set aside. Chop fresh veggies. Place chopped veggies in a large salad bowl. Add peas and stir. Pour dressing over veggies and peas. Toss to coat veggies with dressing. Cover and refrigerate a couple of hours before serving.
Variation:
I’ve already made this salad twice this week. The second time, I used black beans instead of the black eyed peas. When I make this again, I plan to add a chopped avacodo and a little fresh garlic in the mix. I believe we have a new favorite at our house for the new year.
 Share on Facebook
Tags: black eyed pea salad, peas, salad
Filed in Appetizers,Meatless Monday,Soups and Salads | Comments Off on Meatless Monday Black Eyed Pea Salad
Posted by Tara on Thursday, September 15th, 2011
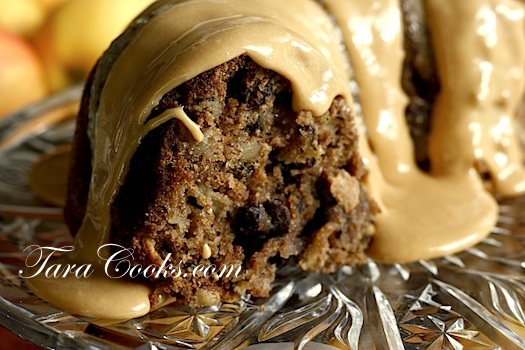
Aunt Polly was a true Southern Belle in her younger days. And she aged with grace and patience and class. And she was a wonderful cook too. I have her hand written recipe for Fresh Apple Cake safely tucked behind A in my recipe box. Having a hand written recipe means a lot to me. Although Aunt Polly was really my husband’s aunt, she made me feel like I was her very own niece. Aunt Polly we miss you, but your Fresh Apple Cake is still a fall favorite at our house.
- 2 cups sugar
- 3 whole eggs
- 2 teaspoons vanilla
- juice of one fresh lemon
- 3 cups plain cake flour
- 1 teaspoon baking soda
- 2 teaspoons cinnamon
- 1/2 teaspoon cloves
- 1/2 teaspoon nutmeg
- 1 teaspoon salt
- 1 1/2 cups vegetable oil
- 3 cups fresh Granny Smith apples chopped fine
- 1 cup chopped pecans or walnuts
- 3/4 cup raisins
In a large mixing bowl, cream the sugar, eggs, lemon juice and vanilla. Set aside. In another large bowl add the flour, baking soda, salt, cinnamon, nutmeg, and cloves. Sift this mixture 2 times. By hand, mix oil alternately with dry ingredients to creamed mixture, starting and ending with dry ingredients. Fold in the chopped apples, nuts, and raisins. Pour batter into a greased and floured bundt pan. Place pan in a 325 degree preheated oven. Bake for approximately 1 hour and 15 minutes. Remove cake from oven and pour caramel glaze over cake while cake is still hot.
In this picture of the cake, I poured some left over salted caramel fondue over the cake instead of the glaze. I think I actually prefer the caramel glaze though.
For the glaze:
- 1 cup sugar
- 1/2 tablespoon Karo white syrup
- 1/2 stick real butter
- 1/2 teaspoon baking soda
- 1/2 cup buttermilk
- 1 teaspoon vanilla
Add the sugar, syrup, buttermilk, butter, and soda to a medium sauce pan. Cook on medium heat stirring constantly until sauce reaches the soft ball stage (I use a candy thermometer), then add the vanilla. Pour glaze over cake while the cake is still hot.
 Share on Facebook
Filed in Uncategorized | 8 responses so far


