Pumpkin Spice Donuts with Maple Glaze – Gluten Free

Posted by on Wednesday, October 17th, 2012

Pumpkin-Donuts

Pumpkin, spice, and maple glaze. YUM! And nobody would ever guess these are GLUTEN FREE!  Go ahead and make them with plain flour if you must but there is no compromise on flavor when made with gluten free baking mix.  The batter took about 5 minutes to whip up and I baked these little gems in my Sunbeam Donut Maker in 6 minutes.

For the donuts:

  • 1 stick melted butter
  • 3 large eggs
  • 1 1/2 cups sugar
  • 1 14 oz can pumpkin (1 1/2 cups)
  • 1 teaspoon cinnamon
  • 1/4 teaspoon nutmeg
  • 1/4 teaspoon ginger
  • 1/4 teaspoon cloves
  • 1 1/2 teaspoons salt
  • 1 1/2 teaspoons baking powder
  • 1 3/4 cups + 2 Tablespoons King Arthur Gluten Free Baking Mix
  • 2 teaspoons vanilla

In a large bowl combine the butter, eggs, sugar, pumpkin and spices.  Add the baking mix, salt, and baking powder and stir until combined. Add the vanilla and combine.  Preheat donut maker according to manufacturer’s instructions.  Spray surface with cooking spray if desired. Add enough batter to fill the bottom portion of each donut form. Close lid and cook donuts approximately 6 minutes.  Remove donuts and place on a wire rack with wax paper underneath (or paper towel or cookie sheet).  Have glaze prepared and drizzle it over hot donuts.  Glaze will ooze and drip off donuts.  I turned donuts over and glazed the other side.  Sprinkle fresh glazed donuts with finely chopped nuts if desired.

For the glaze:

In a medium sized bowl combine:

  • 1 cup powdered sugar
  • 1 cup brown sugar
  • 1/2 stick soft butter
  • 1 teaspoon vanilla
  • 1 teaspoon maple flavor
  • 1/4-1/2 cup real maple syrup
  • 1/2 cup chopped walnuts or pecans (optional for sprinkling on top of freshly glazed donuts)

Combine sugars, butter, vanilla, and maple flavoring.  Beat on low speed with mixer to combine ingredients.  Start with 1/4 cup maple syrup and slowly pour into icing mixture while beating on low speed.  Add up to 1/4 cup more maple syrup if needed to achieve a spreading consistency.

Makes approximately 18-20 3″ donuts.

Filed in Breads, Doughs, and Crusts,Breakfast,Gluten Free | 3 responses so far

Firecrackers – MSG Free!

Posted by on Sunday, October 14th, 2012

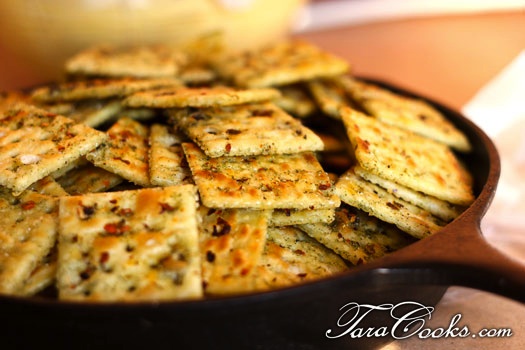
Fire-Crackers

Do you need to turn up the heat or spice up your life a little?  If so, you need to make these hot and sassy saltines to serve with chili or soup, or as a HOT appetizer at your next party.  All of the recipes I researched called for store bought ranch dressing mix. But the store bought varieties are loaded with preservatives and MSG, which I try to avoid.  So I created my own version using my home make RANCH DRESSING MIX and substituting light olive oil in place of traditional vegetable oil for a healthier version.

  • 1 16 oz box saltine crackers (plain or salted)
  • 1 1/2 cups light olive oil
  • 3 Tablespoons Taracooks.com RANCH DRESSING MIX
  • 2-4 Tablespoons crushed red chili pepper flakes
  • 1 teaspoon black pepper
  • 1 2 gallon plastic zip-lock bag

In a medium sized bowl combine the oil, ranch dressing mix, black pepper, and crushed red pepper.  Pour mixture into the plastic bag. Open all the saltines and add them to the plastic bag.  Seal the bag and gently shake bag and turn it over/upside down to thoroughly coat the crakers. Set bag on counter and gently turn/shake it every hour or so through the day (4-6 hours).  When crackers have absorbed most of the oil, spread out 5-6 paper towels and place crackers over paper towels to soak up any excess oil. Place crackers in airtight container until ready to serve. Best if consumed within 7 days.

Filed in Appetizers | Comments Off on Firecrackers – MSG Free!

Freezing Peaches – Peach Cubes

Posted by on Thursday, September 13th, 2012

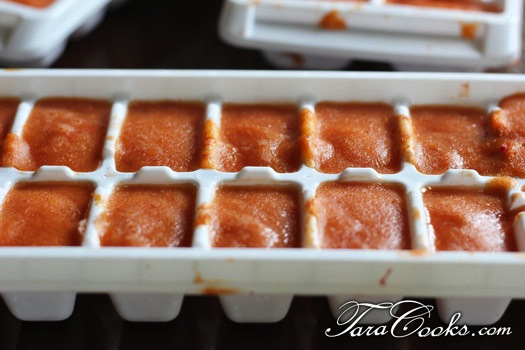
Peach-Cubes-2

This summer I’ve been busy like most working moms.  We’ve painted and camped and cleaned and baked and preserved.  I ran out of time to do as much preserving as I would like to have.  I had 2 bushels of peaches that sat on my counter for a few days, just mocking me as I passed by them.  They got riper and riper and I was determined they would not ruin this year.  So one day I just peeled the peaches, removed the seeds and tossed them in the food processor and made puree out of them.  I had 6 plastic ice cube trays and I simply poured the puree into the trays and froze the peach puree solid.  Then I popped each cube out and placed several in a quart sized Zip-Lock freezer bag.  It was SO easy.  What can you do with peach cubes? I’ve got a few ideas and would love to hear any more you may have.

Toss 3-4 cubes in a food processor with frozen pineapple, OJ, coconut milk, and vanilla protein powder for a tasty breakfast shake.

Toss a few peach cubes into a glass of iced tea for a few minutes to make peach tea.

Toss a few peach cubes into a glass or pitcher of lemonade for peachy lemonade.

Toss a few peach cubes into a bowl of hot oatmeal, reheat if necessary.

Use frozen cubes to make peach cobbler.

Peach cubes, ice cubes, lemon slices, and fresh basil added to fresh chilled water make a refreshing drink.

And you could make fruit cubes as a way to preserve other fresh fruits too. I’ve done strawberry puree and used the cubes in my morning shakes. YUM!

Filed in Miscellaneous | Comments Off on Freezing Peaches – Peach Cubes

Mini Bacon Cheeseburger Pies – Gluten Free

Posted by on Tuesday, August 28th, 2012

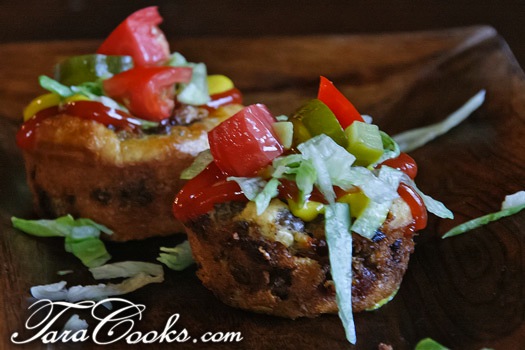
Mini-Cheeseburger-Muffins

This recipe is a slight modification of Texas Recipe’s Mini Cheeseburger Pies.  I whipped up a gluten free version and of course I had to add bacon for my family.  These little pies were incredible and stand alone as a hearty appetizer for football season, camping, or even breakfast.  E A S Y!

Preheat oven to 375 degrees. Spray a 12 count muffin tin with non stick cooking spray.

In a medium bowl whisk the following together to form a batter:

  • 1/2 cup Bob’s Gluten Free Baking Mix + 1/2 teaspoon baking powder + 1/2 teaspoon salt
  • (or use 1/2 cup Bisquick Baking Mix instead of Bob’s and omit the baking powder and salt)
  • 1/2 cup milk
  • 2 eggs

In a large skillet cook the following over medium heat until beef is done and drain excess fat:

  • 1 pound ground beef
  • 1 teaspoon garlic salt
  • 1 Tablespoon Worcestershire sauce
  • 1 medium onion – chopped

Allow cooked beef mixture to cool slightly and add

  • 1 cup shredded sharp cheddar cheese
  • 6-8 pieces cooked and crumbled bacon

Spoon 1 Tablespoon of the batter mixture into greased muffin cups.  Then add 1/4 cup of the meat/cheese mixture to each muffin cup.  Top with another 1 Tablespoon of the batter mixture.  The second time I made these placed some more grated cheddar on top of the batter mixture.  But hey we love cheese!  Bake for 30 minutes OR until a tookpick inserted in center is clean when removed.

Top with your favorite burger toppings:

  • Squeeze ketchup
  • Squeeze mustard
  • Squeeze mayo
  • Chopped lettuce
  • Chopped tomatoes
  • Chopped pickles

Recipe makes 12 mini pies.  I would definitely double this recipe for a party.

Filed in Appetizers,Beef,Main Dishes | One response so far

Southern Green Beans

Posted by on Friday, August 17th, 2012

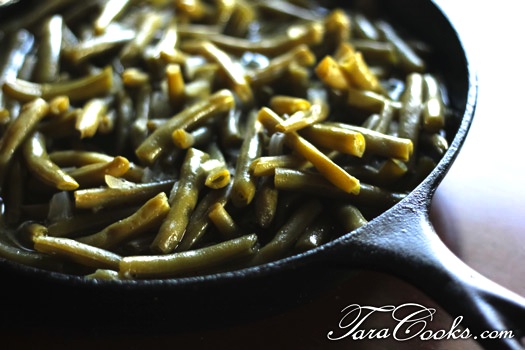
Green-BeansHere’s one of my favorite Southern sides – a “mess” of green beans seasoned just right and served along side a roast beef and mashed potatoes. Perfect side dish for Sunday lunch.  This recipe is for home canned or store bought canned beans.  Fresh green beans require more moisutre and longer cooking time.

  • 1 quart canned green beans (approximately 4 cups or 32 oz) undrained
  • 1 Tablespoon bacon drippings
  • 1 Tablespoon finely chopped onion
  • 1 teaspoon salt (if canned green beans were unsalted)
  • 1 teaspoon black pepper
  • 1 teaspoon sugar

Place all ingredients in a large iron skillet and heat over medium high until liquid from beans begins to boil.  Reduce heat to a simmer and let beans cook for 10-15 minutes.  Water can be added a cup at a time to keep beans from boiling dry.

Filed in Side Dishes | One response so far

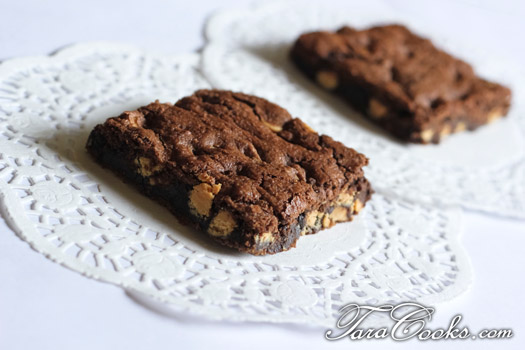
Gluten Free Reese’s Brownies

Posted by on Thursday, July 26th, 2012

Gluten Free Reese's Brownies

Looking for some great gluten free treats? What better way to satisfy your sweet tooth than with chocolate and peanut butter?

  • 2 1/4 sticks real butter softened
  • 2 cups sugar
  • 3/4 cup cocoa
  • 2 teaspoons vanilla
  • 2 eggs
  • 2 cups Bob’s Gluten Free Baking Mix
  • 1/2 teaspoon salt
  • 1 teaspoon baking soda
  • 1 10 oz package Reese’s Peanut Butter baking chips

In large bowl beat butter until light and fluffy.  Add sugar, cocoa, and vanilla and blend well. Add 2 eggs and mix well.  In a separate bowl mix the flour, salt and baking soda together until well blended. Then add flour mixture to butter sugar cocoa mixture and blend well.  Add peanut butter chips and stir.  Spread mixture into a 10×14 pan. Place in a preheated 350 degree oven approximately 20 minutes.

Printable Recipe:

Gluten Free Reese’s Brownies

Filed in Cookies, Candies, and Squares,Gluten Free | Comments Off on Gluten Free Reese’s Brownies

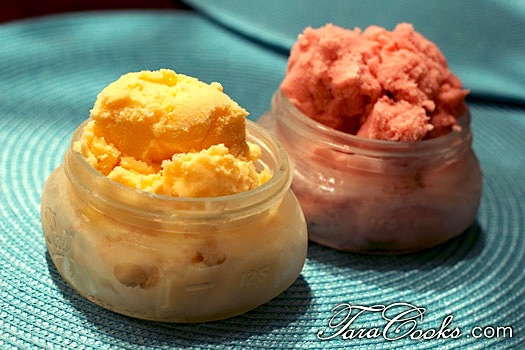
Cream Soda Ice Cream

Posted by on Saturday, July 21st, 2012

Creme Soda Ice CreamLooking for ways to beat the summer heat?  Ice cream does the trick for me.  I’m not a huge fan of heavy ice cream flavors but I do enjoy the fruity tasty of these ice creams made with orange and cherry cream soda.  There are only 3 ingredients and whipping this up is a breeze.

  • 8 cups of your favorite cream soda
  • 2 cups whipping cream
  • 2 14 oz cans sweetened condensed milk

In a large bowl stir the whipping cream and condensed milk together until blended.  Pour mixture into 4 quart ice cream freezer (recipe can be halved for smaller 1 1/2 quart freezer).  Slowly add the creme soda and stir gently with a wire whisk to blend soda with the condensed milk/whipping cream mixture.  Freeze mixture according to manufacturer’s directions.  Serve right away and store ice cream in an air tight container in freezer.

Printable Recipe

Cream Soda Ice Cream

Filed in Desserts | 4 responses so far

Beg For More Bacon Dip

Posted by on Friday, July 13th, 2012

Bacon-Cheddar-Camping-Dip[1] - Version 2

I don’t understand the mystery of bacon, but somehow just the smell of bacon seems to put people in a better mood.  The day I created this recipe, we had bacon for breakfast, this dip for lunch and bacon wrapped meatloaf for dinner.  I guess bacon is an important part of our lives.

  • 1 medium carrot, peeled and cut into 3″ sticks
  • 1 medium cucumber peeled and seeded, cut into chunks
  • 1 medium tomato, quartered and seeds removed
  • 1/2 green bell pepper, seeds removed and cut into chunks
  • 1/2 sweet onion, peeled and cut into chunks
  • 2-3 green onions, chopped
  • 1 teaspoon garlic powder
  • 1 teaspoon salt
  • 1 teaspoon black pepper
  • 1/4- 1/2 teaspoon ground red pepper
  • 1/2 cup mayo
  • 1/2 cup sour cream
  • 3 oz package cream cheese
  • 1 8 oz bar sharp cheddar cheese -grated
  • 6 strips bacon cooked and crumbled

Add all the fresh vegetables to a food processor and pulse until ingredients are finely chopped (but not pureed).  Add the seasonings, mayo, sour cream, and cream cheese and pulse until mixture is blended.  Stir in the crumbled bacon and cheese, leaving a few crumbles for garnish.  Refrigerate until ready to serve then top with remaining bacon crumbles. Serve with carrot and celery sticks, Wheat Thins or Triscuit crackers, or spread over rye toast or your favortite deli bread.

Filed in Appetizers | Comments Off on Beg For More Bacon Dip

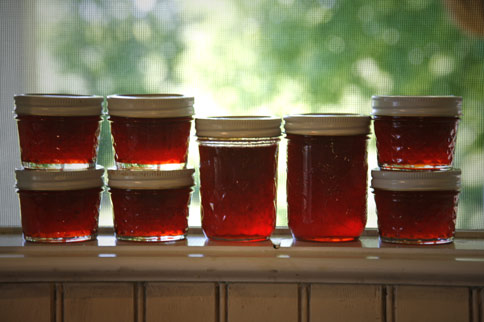
Organic Strawberry Jam

Posted by on Monday, May 7th, 2012

I’ve made jam only a couple of times in my life – and the jam I made was actually strawberry freezer jam. Does that count as real jam?  This year, after making a second trip to Kelly’s Strawberry Patch, I decided to make the real stuff, the kind that can be stored on the shelf. That way I will have more room in the freezer for our garden veggies!

I wanted to make jam and use those adorable little jars because I plan to give jam and bread as gifts later on. I got a case of 12 ¼ pint jars at Wally World for around 7$. I really didn’t want to shell out that much cash, but considering this would allow me to give 12 gifts later – I bought them. I also purchased a couple of boxes of SURE JELL and 5 pounds of sugar.

Here’s the shopping list for one batch of jam – but I doubled it because we LOVE it

  • Fresh Strawberries – 4 pints = 2 quarts = ½ gallon (Organic if possible)
  • 1 box SURE JELL (I did NOT use the sugar free variety)
  • 8 cups sugar (organic of possible)

First wash berries and cap them. I love to use my Pampered Chef tool to do this. The tip of a carrot scraper works well to cap the berry and remove that white pipe cleaner thingy from the middle (those things can give your strawberry dishes a bitter taste sometimes).

Next crush the berries using a potato masher, leaving some chunks. The recipe says NOT to puree the berries. So I nearly pureed my berries in the food processor . I don’t like chunky jam. I also don’t like being told how finely I can chop my berries. I’m such a rebel so there! You will need precisely 5 cups of crushed or nearly pureed strawberries.

The proper way to prepare the jars and lids for canning is to boil everything, lids, jars, and rings and keep all items very hot until the jam is ready to pour into the jars. I loaded the jars in the dishwasher and ran the sanitize cycle with the high temp dry option. I kept the door closed until the jam was ready to pour. Meanwhile, I had boiled the rings and lids in water for a couple of minutes. I turned off the heat and left the rings and lids in the water until time to seal the jars. The lids and rings were still so hot; I had to use tongs to remove them from the pot!

In large bowl measure EXACTLY 8 cups sugar, and set aside.

Measure EXACTLY 5 cups of mashed fruit and pour into a 6-8 quart pot. Add a couple of tablespoons of lemon juice to the fruit if you like extra tanginess. Then stir in 1 box of SURE JELL into fruit and add ½ teaspoon butter to reduce foaming. Bring mixture to a full rolling boil on high heat STIRRING CONSTANTLY.

When fruit reaches a full rolling boil, QUICKLY ADD SUGAR, RETURN TO A FULL ROLLING BOIL, AND BOIL FOR EXACTLY 1 MINUTE, STIRRING CONSTANTLY. Remove from heat and skim off any foam.

Quickly ladle jam into prepared jars, filling to within 1/8 “ from the top of jar. Wipe any excess from jars and threads with a clean cloth or paper towel. Cover jars with lids and screw bands on tightly.

Place jars on an elevated rack in a canner. Lower the rack into canner. Water must cover jars by 2 inches. Add boiling water if needed. Cover, bring water to gentle boil. Process jam 10 minutes. Remove jars and place upright on a towel to cool. After jars cool check the seal of each jar by pressing middle of lid with finger. If lid springs or pops back up, it is not sealed and needs to be stored in fridge right away. Let jars stand at room temp for 24 hours. Store them in a cool dry dark place for up to a year. Refrigerate any opened jam for up to 3 weeks.

I must confess a few things. I got confused on the instructions and added my sugar to the fruit from the beginning. I also used ½ TABLESPOON butter instead of teaspoon. My eyes aren’t behaving, what can I say? I also don’t own a canner. So I boiled water in my largest stock pot and I used tongs to place the jars in the boiling water and to remove them. I was really pleased and a little surprised that my jam turned out the right consistency and tasted pretty good in spite of me and my mistakes.

Printable Recipe

Organic Strawberry Jam

Download Adobe Reader

Filed in Canning | 6 responses so far

Sopapillas

Posted by on Friday, May 4th, 2012

Sopapillas

Sopapillas are South of the Border pastries made with basic ingredients, deep fried, then coated with cinnamon and sugar. Some folks like to bite off the corner, squirt honey into the centers, and then devour them. Make a batch of sopapillas today and discover your favorite way to eat them!

  • 1 ¾ cup plain flour
  • 1 Tablespoon sugar
  • 1 teaspoon baking soda
  • 1 teaspoon salt
  • 2 teaspoons baking powder
  • 2/3 cup milk
  • Hot vegetable oil for frying
  • 1 cup sugar
  • 1 Tablespoon cinnamon
  • Honey – optional

Mix dry ingredients together in a medium sized bowl. Add the milk and knead for 1 minute on floured surface. Let dough set for one hour. Roll dough into large rectangle 1/8” thickness. Use a pizza cutter to cut 2” wide strips of dough, then cut strips into 2” squares, then cut squares diagonally in half.
Mix sugar and cinnamon in a shallow baking dish and set aside.
Heat 4 cups vegetable oil in deep fryer. When oil reaches 375 degrees, drop dough triangles into hot oil. They should rise to the surface, and puff, then brown on the bottom very quickly. Use tongs to quickly turn sopapillas over. When dough is golden brown on both sides, remove from oil carefully, and place on paper towels. While sopapillas are still very warm, put them in the cinnamon and sugar mixture and spoon mixture over sopapillas to thoroughly coat them.

Printable Recipe

Sopapillas

Download Adobe Reader


Filed in Appetizers,Desserts | 24 responses so far

« Newer Entries - Older Entries »