Posted by Tara on Monday, September 21st, 2009
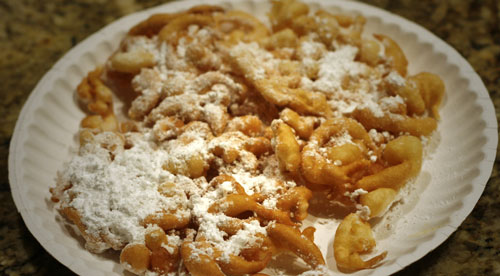
One of our favorite family pastimes is attending the Wilson County Fair each year. We love the exhibits, the animals, the rides, and most of all – the food. Why does fair food smell so delightful? Once a year, I might indulge in a corn dog, or a funnel cake. This year, I skipped my annual fair indulgence – only to regret doing so later. I had to find an acceptable funnel cake recipe and fast, else I’d be craving one for another whole year.
If you love funnel cakes, but have never tried making them – you should consider making them soon. Only 5 minutes stands between you and a warm, crispy, powdered sugar funnel cake. They’re quick, they’re easy, and they’re fun fun fun!
Ingredients:
- 3 cups vegetable oil
- 4 cups flour
- 1/3 cup granulated sugar
- 2 teaspoons baking powder
- 1/2 teaspoon salt
- 2-1/2 cups milk
- 1 Tablespoon Vanilla
- 3 large eggs
- Confectioners’ sugar, for dusting
Directions:
- In a deep medium skillet, heat the oil over medium-high heat until it registers 350° to 375° on a deep-fat thermometer.
- Meanwhile, in a large bowl, whisk together the flour, granulated sugar, baking powder and salt. Make a well in the center and add the milk, vanilla, and eggs; whisk until smooth.
- Transfer about a cup of batter into a large funnel, holding a finger over funnel opening until you are ready to pour batter into the hot oil. Carefully drizzle about 1 cup batter (one-eighth of the mixture) back and forth into the oil, making a free-form lacy web.
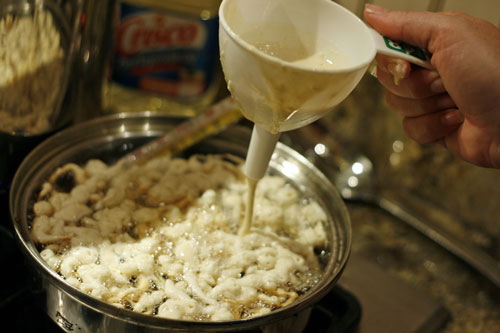 Cook until golden on the bottom, about 2 minutes. Using tongs, turn funnel cake over and cook until golden on the other side, about 1 minute more. Transfer the funnel cake to paper towels to drain briefly. Repeat with the remaining batter
- Dust the funnel cakes with confectioners’ sugar and serve hot. Other toppings to consider are chocolate syrup, preserves, apple topping, cinnamon and sugar, or even caramel topping. YUM!
Printable Recipe
Download Adobe Reader
 Share on Facebook
Tags: Funnel Cake
Filed in Desserts | 4 responses so far
Posted by Tara on Thursday, September 17th, 2009
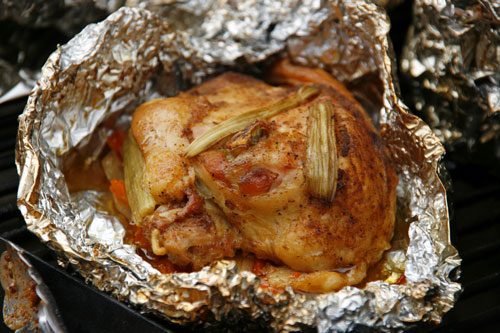
Fall is just around the corner and that means football, tailgating, camping, and bonfires. I can’t think of a heartier, tastier meal than campfire chicken. Assemble individual portions of campfire chicken in foil ahead of time so you can relax and enjoy your outing. This is one of our family favorites. I still remember asking our daughter, who was 3 years old at the time, what her favorite dish was. She replied, “camping chicken.”
- 4-5 chicken breasts with ribs and skin
- 4-5 medium potatoes – cut into thin sticks
- 4 medium carrots, sliced, cut into 3” sticks
- 1 medium onion quartered
- 2 ribs celery cut into 3” strips
- Real butter
- Campfire Chicken Seasoning
- Heavy Duty Foil
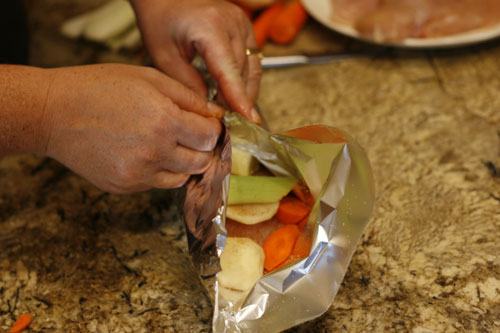
Rinse chicken breasts and pat dry. Tear off 18” piece of heavy duty foil. In the center of the foil, place a single serving of carrots and potato sticks. Take a quarter of a sweet onion and thin slice it. Place it on top of the potato and carrot sticks. Sprinkle a little Campfire Seasoning over veggies. Add a couple of celery pieces and 3-4 pats of real butter. Top with a chicken breast. Sprinkle chicken breast with Campfire Seasoning – more or less to suit your taste. Seal all in foil by folding edges together towards top and center of chicken.
To cook:
Oven Method: Bake at 425 degrees 40-50 minutes or until chicken and veggies are tender and thoroughly cooked.
Dutch oven: Place foil pouches in a Dutch oven and cover with lid. Cook over charcoal or campfire. 1 charcoal briquette equals 25 degrees, so place about 8 coals on top and underneath Dutch oven. Cook 40-60 minutes.
Smoker Method: Place foil pouches in a preheated 300 degree smoker. Cook slowly at least 2 hours or until chicken is thoroughly cooked and veggies are tender. Open foil last 30 minutes.
Combine and store in a shaker or zip lock bag. Sprinkle over chicken before roasting.
Printable Recipe
Download Adobe Reader
 Share on Facebook
Tags: Campfire Chicken
Filed in Chicken | 6 responses so far
Posted by Tara on Saturday, September 12th, 2009
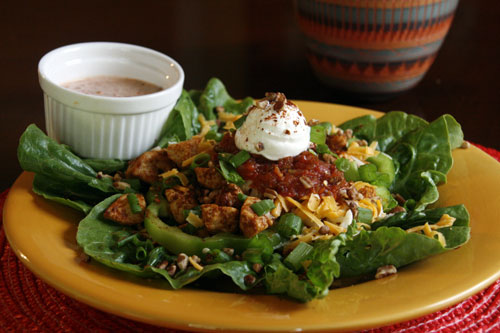
Are you bored with your normal salad routine? Are you ready to kick up the flavor a notch or two? Make this salad soon. It’s loaded with protein and nutrition. It is also low in carbs and is very satisfying. Make the chicken up ahead of time and store in the fridge in ziplock bags for a quick dinner.
In a large skillet – add 2-3 Tablespoons Olive Oil. Heat skillet to medium heat. Add chicken and seasoning mix. Stir chicken and continue cooking over medium to medium high heat until chicken is done (5-6 minutes).
Build your salad with your favorites:
- 1 head of romaine lettuce – washed and torn into pieces
- Sliced cucumber
- Sliced Onions
- Sliced Green and/or Red Pepper
- Avocado Chunks
- Black Olives
- Cheddar, Colby, or Montery Jack Cheese
- Sour Cream
- Tortilla Chips
Salsalita Dressing – mix ½ cup ranch dressing and ½ cup salsa together before serving. Pour a couple of Tablespoons over salad.
Yield 4 rather large plates of salad.
Printable Recipe
Download Adobe Reader
 Share on Facebook
Tags: chicken taco salad, salsalita
Filed in Soups and Salads | Comments Off on Chicken Taco Salad
Posted by Tara on Thursday, September 10th, 2009
One of the main reasons for this web-site is to help encourage cooks everywhere to prepare more wholesome meals at home and rely less on take out or processed ingredients. My body simply cannot tolerate some additives and preservatives found in many foods on the grocery shelves. MSG or MonoSodium Glutamate is found in countless foods and cooking ingredients. Many kid friendly breakfast and lunch foods are loaded with MSG, food colorings, and other preservatives and chemicals. Many folks would probably change the quality of food that enters the mouth if they would take time to read the food labels. I believe these additives are making us sick and depriving us of a better quality of life.
Not only is it HEALTHIER to make your own varieties of seasonings, but it is also CHEAPER too. Although I buy as many organic spices as I can find, I still save money by making my seasonings instead of buying all those packets of seasonings. Here’s a quick and easy way to create your own taco seasoning. This recipe can be multiplied and stored in an airtight container.
4 Tablespoons Chili Powder
3 Tablespoons Cumin
3 Tablespoons Paprika
2 Tablespoons Onion Powder
2 Tablespoons Garlic Powder
¼ teaspoon cayenne pepper (more or less to suit your heat tolerance)
Combine all ingredients and store in an airtight container. Use about 2 Tablespoons of this seasoning mixture for each pound of chicken, beef, or turkey. Yields about 8 batches of seasoning.
 Share on Facebook
Tags: taco seasoning
Filed in Miscellaneous | 2 responses so far
Posted by Tara on Tuesday, September 1st, 2009

This is absolutely one of THE best sugar free desserts I have ever tasted and it can be made in a snap. Hubby eats it. The kids LOVE it. I don’t think they know it is sugar free. If you have a loved one on a restricted carbohydrate or sugar-free diet – make this for them soon. It is delightful. And they never have to know that the magic ingredient that gives this mousse such smooth silkiness is soft tofu. This will remain our secret. Agreed?
1 4 oz package Chocolate Sugar-Free Instant Jello Pudding
1 10 package soft tofu
2 Tablespoons unsweetened cocoa powder
1 Tablespoon instant coffee crystals mixed with 2 Tablespoons hot water
1 pint real whipping cream – whipped and divided
In a large mixing bowl, add the pudding mix, tofu, cocoa powder and mixed coffee. Beat with an electric mixer on medium high until very smooth.
In separate bowl, mix the whipping cream until soft peaks form.
Fold 2 cups whipping cream into the mixed mousse mixture. On low speed, blend the mousse mixture briefly with the whipped cream. Over mixing can result in a butter like texture.
Serve in parfait dishes and garnish with some of the remaining whipped cream, chocolate shavings, or a sprig of mint.
This recipe can be made with vanilla pudding – just omit the cocoa powder and coffee. Of course it can also be made with regular pudding as well.
Printable Recipe
Download Adobe Reader
 Share on Facebook
Filed in Desserts | One response so far
Posted by Tara on Saturday, August 29th, 2009
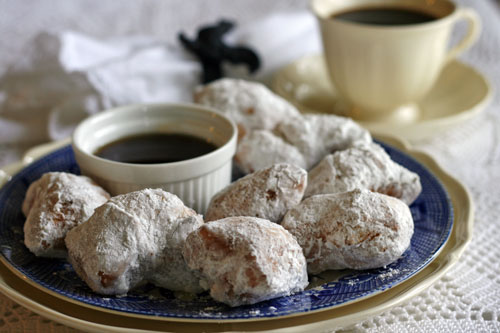
In 2003, dear hubby and I visited New Orleans for his 40th birthday and our anniversary. We enjoyed that trip immensely and were charmed by the city’s history, culture, architecture, and delicious food. One of my fondest, most romantic memories of that trip was sitting outside Café DuMonde – eating my first Beignet and drinking some fabulous coffee with my mate. Since the trip, I have bought Beignet mix and tried a few recipes. But the following recipe is a close rival of the Café DuMonde Beignet. I can’t take credit for the recipe because I found it somewhere on the internet. But I can take credit for eating too many Beignets this morning! And I must say -they were TRES BEIN!
In 2005, two years after our trip, Hurricane Katrina slammed the Louisiana coast- killing over 1000 people, leaving over a million Americans homeless, and devastated much of New Orleans. I wanted to post a recipe to honor all those who lost lives, helped save lives, or whose lives were displaced by this catastrophe. Here’s a loving hug from one Southern gal to all those who are still hurting. If I could cook your hurt away, I would! Keep the French Quarter cuisine alive. Make Beignets!
- 1 cup lukewarm water
- 1/4 cup sugar
- 1/2 teaspoon salt
- 1 egg, room temperature & beaten
- 2 tablespoons butter, softened
- 1/2 cup evaporated milk
- 4 cups bread flour or all-purpose flour
- 3 teaspoons instant active dry yeast
- Vegetable oil
- Powdered sugar for dusting
Using a mixer with a dough hook, place water, sugar, salt, egg, butter, evaporated milk, flour, and yeast in the bowl. Beat until smooth. Form dough into an oval, place in a lightly greased bowl, cover with plastic wrap, and refrigerate until well chilled (3 to 4 hours) or overnight.
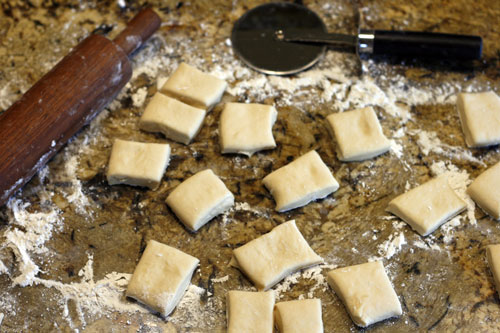
To prepare dough, remove from refrigerator and roll out on a lightly floured board to 1/2-inch thickness. Cut into approximately 3-inch squares or circles.
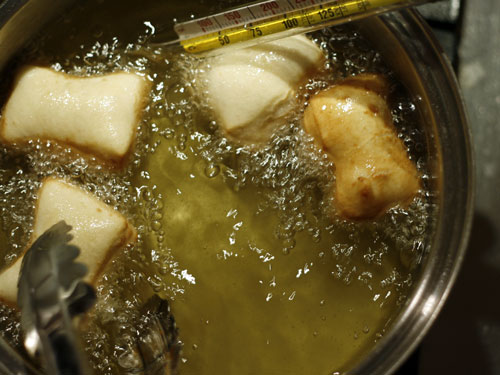
In a deep fryer or large pot, heat vegetable oil to 360 degrees F. Monitor oil temperature at all times. The oil should remain at least 350 degrees, but not more than 375 degrees. Adjust heat accordingly.
Fry the beignets (2 or 3 at a time) 2 to 3 minutes or until they are puffed and golden brown on both sides, turning them in the oil with tongs once or twice to get them evenly brown; beignets will rise to the surface of the oil as soon as they begin to puff. (If the beignets don’t rise to the top immediately when dropped into the oil, the oil is not hot enough)
Remove from oil and drain on paper towels, then sprinkle heavily with powdered sugar. Serve hot. We dip ours in syrup or coffee.
Printable Recipe
Download Adobe Reader
 Share on Facebook
Tags: Beignets, Cafe Du Monde, New Orleans
Filed in Breads, Doughs, and Crusts | Comments Off on Beignets
Posted by Tara on Tuesday, August 25th, 2009
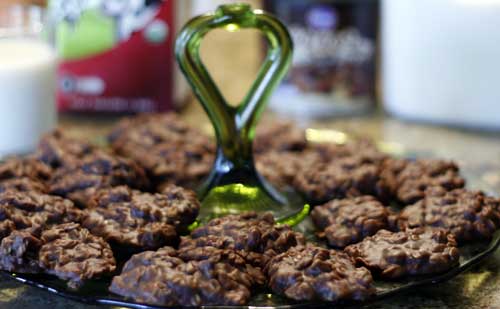
This is one of the easiest Southern treats I know how to make. I have fond memories of playing Rook and eating Fudgies at Grandmother’s house. Grandmother was the Rook champion of Trousdale County, and I still remember her whipping up Fudgies between Rook games on cold winter nights at her house. To please my Granddaddy, Grandmother would slice a bar of cheddar cheese, break out the Saltines, and serve those treats alongside the Fudgies on a platter. Everyone would devour fudge and cheese, and get right back to Rook. That deck of Rook cards was so grimy and sticky from all that sugar and grease, but I don’t think Grandmother ever had the heart to buy a new deck.
- 1 stick REAL butter (I use salted)
- 2 cups sugar ( pronounced shu ga)
- ½ cup cocoa
- 1 5 oz can evaporated milk
Pre measure and have ready to add to the boiled mixture:
- 3 cups oats (not quick cooking kind)
- ½ cup peanut butter (crunchy or smooth)
- 2 teaspoons vanilla
One strip of wax paper 24” in length
In a small bowl, combine sugar and cocoa, stirring to evenly blend the cocoa into the sugar.
In a large skillet, melt butter over medium heat. Pour sugar and cocoa mixture into the melted butter and mix well. Slowly add evaporated milk, stirring constantly. Continue stirring until mixture continues to boil in spite of the stirring. Set timer for 90 seconds and continue stirring while mixture boils. Remove skillet from heat and add the peanut butter and vanilla and blend well. Quickly add the oatmeal and blend. Spoon fudge onto wax paper using a 1 oz cookie dough scoop. Let fudgies cool – and enjoy!
Printable Recipe
Download Adobe Reader
 Share on Facebook
Tags: cookies, oatmeal fudgies
Filed in Cookies, Candies, and Squares,Desserts | 10 responses so far
Posted by Tara on Thursday, August 20th, 2009
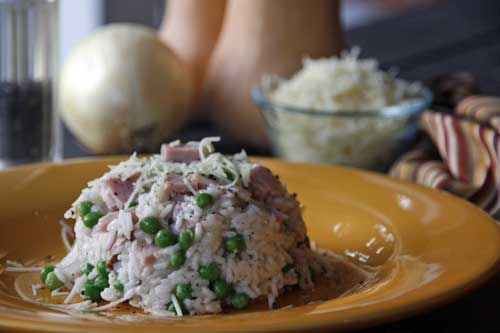
Danny Evins should be a familiar name to local residents of my hometown since he founded Cracker Barrel Old Country Store nearly 40 years ago. Danny’s daughter Betsy and I were friends in high school and college. We were both brides’ maids in each other’s wedding. Although we don’t see each other much any more – I still use several Evins’ family recipes. This is Danny’s recipe for Risi e Bisi – or rice and peas. His recipe calls for chopped ham, but you could omit the ham for a lighter meal, or add some thick sliced prosciutto. This dish is a complete meal by itself and is the perfect way to use up all that leftover holiday ham.
- 5 cups chicken stock
- 4 Tablespoons butter
- ½ cup chopped onion
- 2 cups fresh green frozen peas
- 1 ½ cups plain white raw rice
- 1 cup cooked diced smoked ham
- 2 more Tablespoons soft butter
- Parmesan Cheese
Boil chicken stock then reduce to a simmer.
In large skillet or pot sauté the 4 Tablespoons butter and onion. Add peas, rice, and diced ham and stir. When rice grains turn opaque, add 2 cups simmering chicken stock. Cook uncovered for 5 minutes. Repeat this process until all chicken stock has been add to the rice mixture. Serve hot with butter and Parmesan cheese.
Printable Recipe
Download Adobe Reader
 Share on Facebook
Tags: peas, Rice, Risi e Bisi
Filed in Main Dishes | One response so far
Posted by Tara on Monday, August 17th, 2009
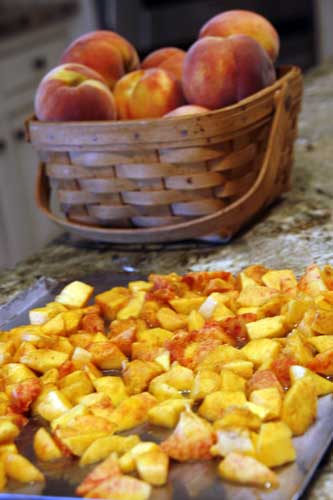
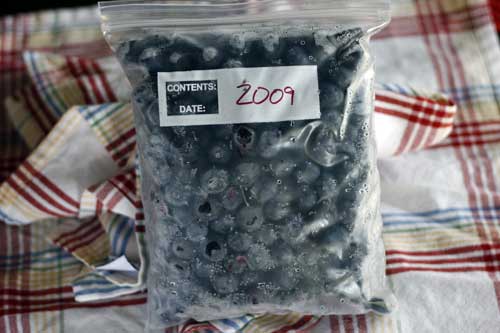
By the end of summer, our extra freezer will be full of corn, peaches, and blueberries, and strawberries. I love having these tasty fruit items on hand to make our breakfast shakes and fruit cobblers. Frozen peaches, blackberries, and strawberries can also be used to make preserves at a later date too. I felt so blessed to find blueberries at Aldi recently for $0.99 a pint! I bought a flat of blueberries to freeze.
Freezing blueberries is so easy. Simply wash the berries and drain them in a colander. Place them in a zip lock freezer bag, label and date, and place them on a flat surface in the freezer to freeze. Here’s a quart bag of blueberries – just waiting to be transformed into blueberry muffins, or blueberry pancakes, or best of all blueberry crumb pie! More blueberry recipes will be coming soon.
Freezing peaches is a little trickier for me. Since I only need a few peach pieces at a time for breakfast shakes, I have to take a little more care in the freezing step. First I peel the peaches. Then remove the pit by making a circular cut all around the middle of the peach and pulling the halves apart. Next I cut the halves into about 4-6 1” pieces. Then I place each piece on a cookie sheet that will easily fit on the freezer shelf. A 9×13 cake pan will also work nicely. I use 3 pans at a time, filling each pan with 1” peach pieces. I take care not to let the peaches touch each other, then place all 3 pans in the freezer. I let the pieces freeze hard for a couple of hours, then remove the pans from the freezer. I let the pans set a few minutes on the counter so the peach pieces will be easier to remove from the pans – being careful not to let the peaches thaw out. This will allow me to use a flexible plastic spatula and scoop up the peaches into a quart size zip lock freezer bag. I label and date the bags then return the bagged peaches to the freezer for a long winter’s nap. One of my favorite winter treats is a steaming hot bowl of peach cobbler and that recipe will be coming soon here.
In an earlier post I followed the same steps for freezing peaches with strawberries. Again these frozen berries come in handy for morning shakes, in certain breads and pastries, and even for making jam when time allows.
Anybody have any other uses for frozen fruit you’d like to share??
Printable Recipe
Download Adobe Reader
 Share on Facebook
Tags: freezing blueberries, freezing peaches
Filed in Canning,Healthy Cooking | Comments Off on Freezing Peaches and Blueberries
Posted by Tara on Tuesday, August 11th, 2009
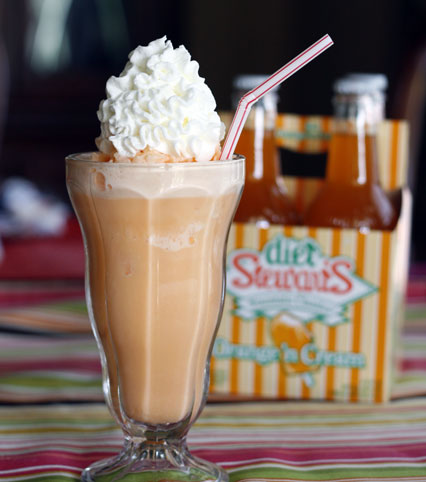
Just because I cut back on sugars and carbs doesn’t mean I sacrifice simple pleasures. Here’s one of my favorite summertime sugar free treats. I whip this up in under a minute in our Magic Bullet. It can also be made in a blender.
- 1 cup ice cubes
- 1 12 oz bottle chilled Stewart’s Orange Cream Diet Soda – measure 1 cup
- ¼ cup half-n-half or real whipping cream
- Ready Whip
In a blender or Magic Bullet add ice cubes, 1 cup soda, and the cream or half and half. Blend until mixture is smooth.
Pour into a tall parfait glass and garnish with some Ready Whip. Enjoy!
Printable Recipe
Download Adobe Reader
 Share on Facebook
Tags: float, sugar free
Filed in Desserts | Comments Off on Sugar Free Orange Cream Float
 Cook until golden on the bottom, about 2 minutes. Using tongs, turn funnel cake over and cook until golden on the other side, about 1 minute more. Transfer the funnel cake to paper towels to drain briefly. Repeat with the remaining batter


